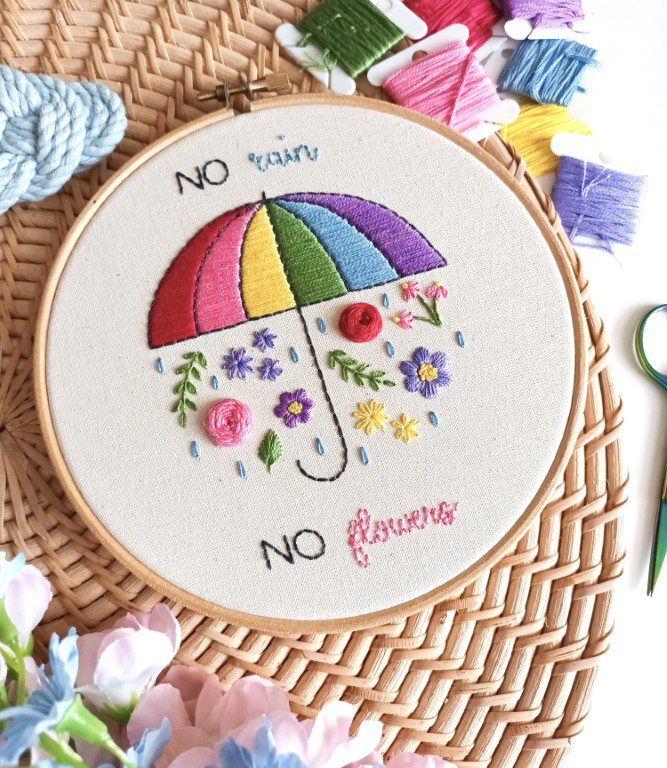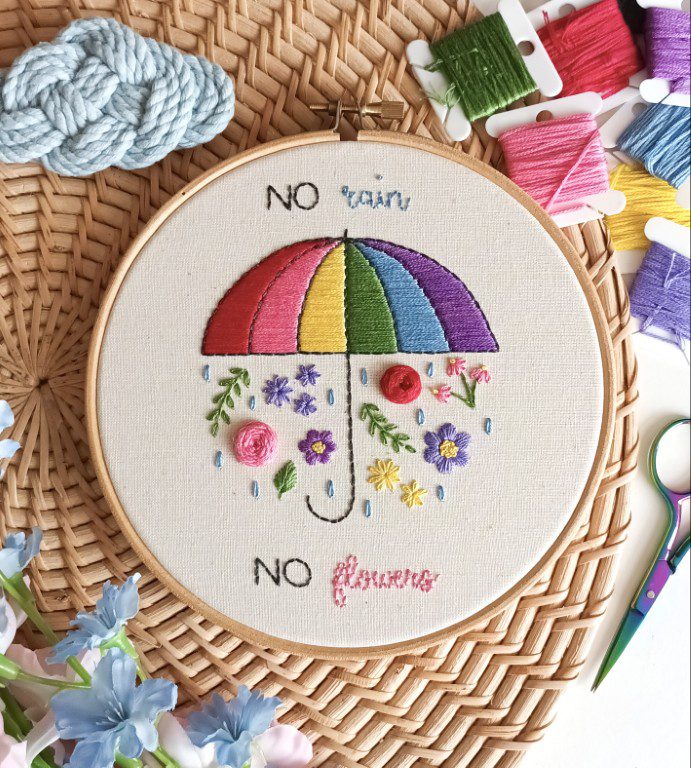
Everyone knows that April showers bring May flowers! This uplifting spring project comes to the EGA Free Projects Library courtesy of Beatrice Gessa of Embearoidery, a self-taught embroidery artist based in the UK. Embearoidery designs charming surface embroidery patterns, kits, stick + stitch patches, and accessories to inspire needleworkers.
Embroidery Level
Beginner
Materials & Instruments
- Instructions and Pattern
- Size 5 embroidery needle when using 1-3 strands of thread
- Size 24 tapestry needle when using 4-5 strands of thread
- Natural calico medium weight cotton (any 100% cotton fabric will work)
- 6” embroidery hoop
- DMC threads in 3799 Pewter grey – very dark; 326 Rose – very dark; 603 Cranberry; 726 Topaz – light; 988 Forest green – medium; 813 Blue – light; 208 Lavender – very dark; 155 Blue violet – medium dark
- Heat erasable pen, sticky water soluble stabiliser, or similar tool for transferring the pattern design to fabric
Stitches Used
- Back stitch
- Satin stitch
- Detached chain stitch or lazy daisy stitch
- Woven wheel stitch
- Stem stitch
- Fishbone stitch
- Straight stitch
- French knot
Notes
There are few different ways to transfer your pattern: one of my favorites that works absolutely wonderfully for me, is a heat erasable pen. I use Pilot Frixion, it comes in many different colors and any big stationery shop has it. However, please note, if you use Pilot Frixion on a colored fabric, it might leave a light ghost line after heating the fabric, so if in doubt I would suggest trying the pen on a little corner first.
You draw your pattern on the fabric, stitch on it, then use your hair dryer or an iron and voilá, the ink disappears like magic! It might come back if you place your fabric in very cold temperatures (for example, if you send it via mail and it’s stored on planes or similar), but if you use the hair dryer again, it will disappear.
In order to draw onto the fabric with your pen of choice, you can use a sunny window (place the paper with the design and the fabric on top against a window, and use sunlight to draw on it), a lightbox, or even a tablet/iPad (you can use the digital version and save yourself the bother of printing out your pattern if you do it this way).
Another great fabric transfer method is the Sticky Solvy by Sulky: you can print the design directly onto the sheet with your home printer, then stick it on the fabric and stitch on top of it; once finished stitching, leave it soaking in slightly warm water for 5-10 minutes and the magic paper will dissolve itself! You might need to remove the last remaining pieces by placing the fabric under warm running water and gently rubbing it a couple of times. It works especially well on thick or dark fabrics, which make it very hard to trace the designs with pens. Just be aware your needle might be slightly sticky after; you can wipe it from time to time to help remove the glue.
Instructions
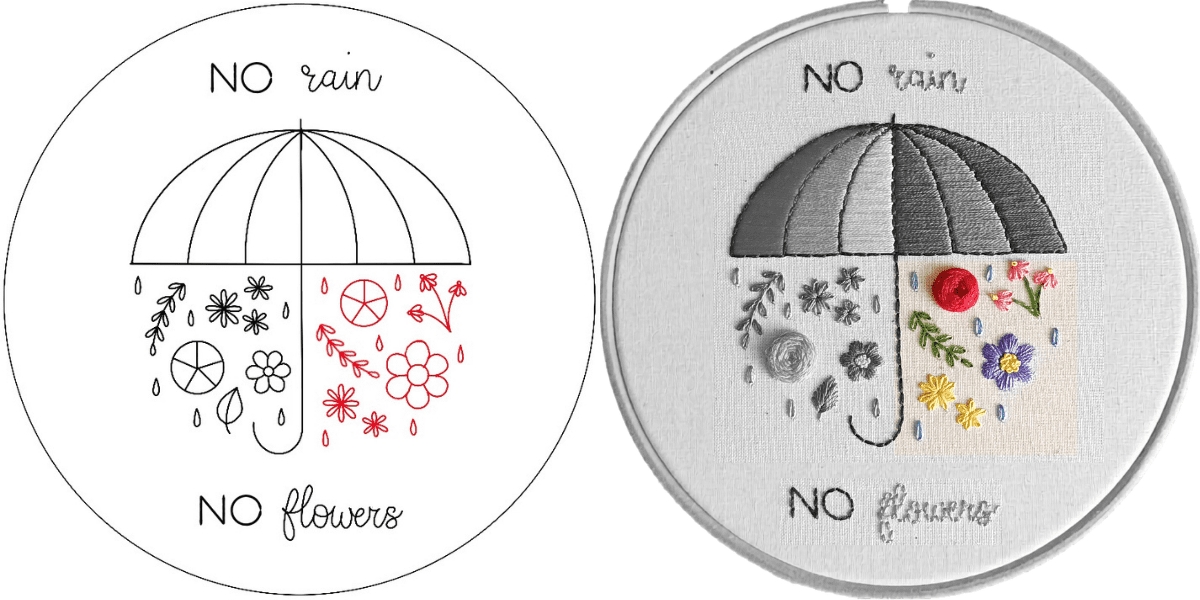
Quote
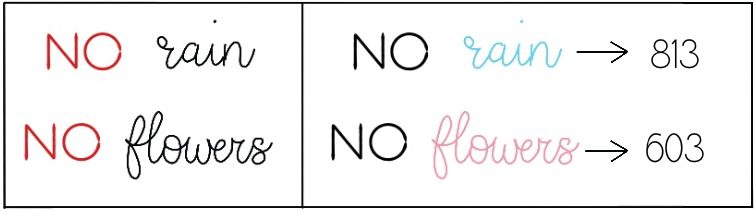

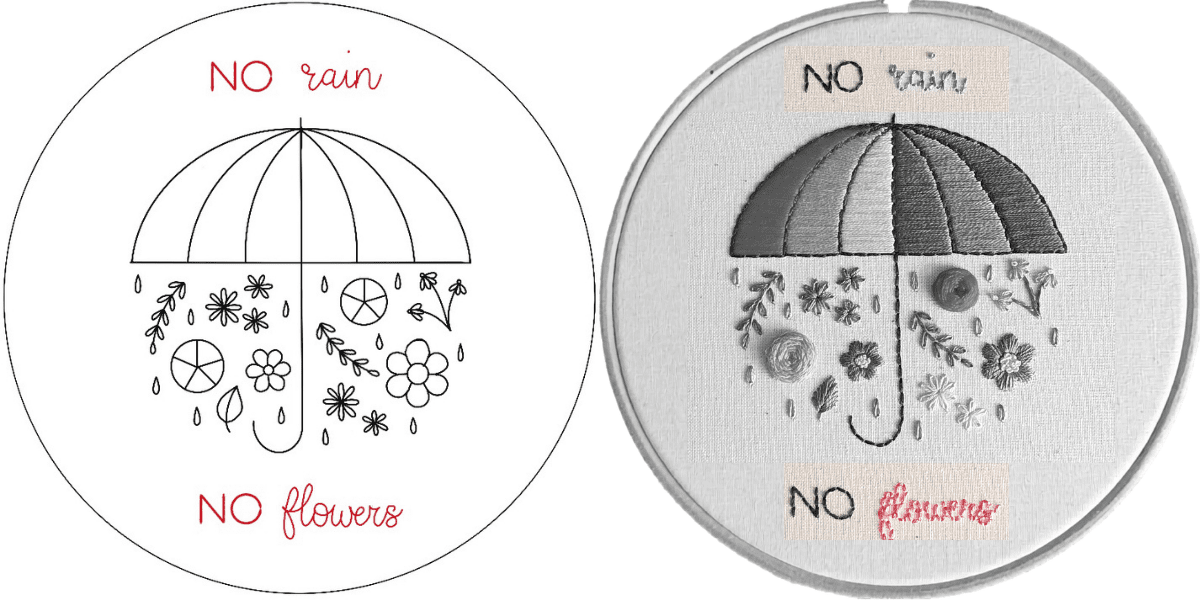
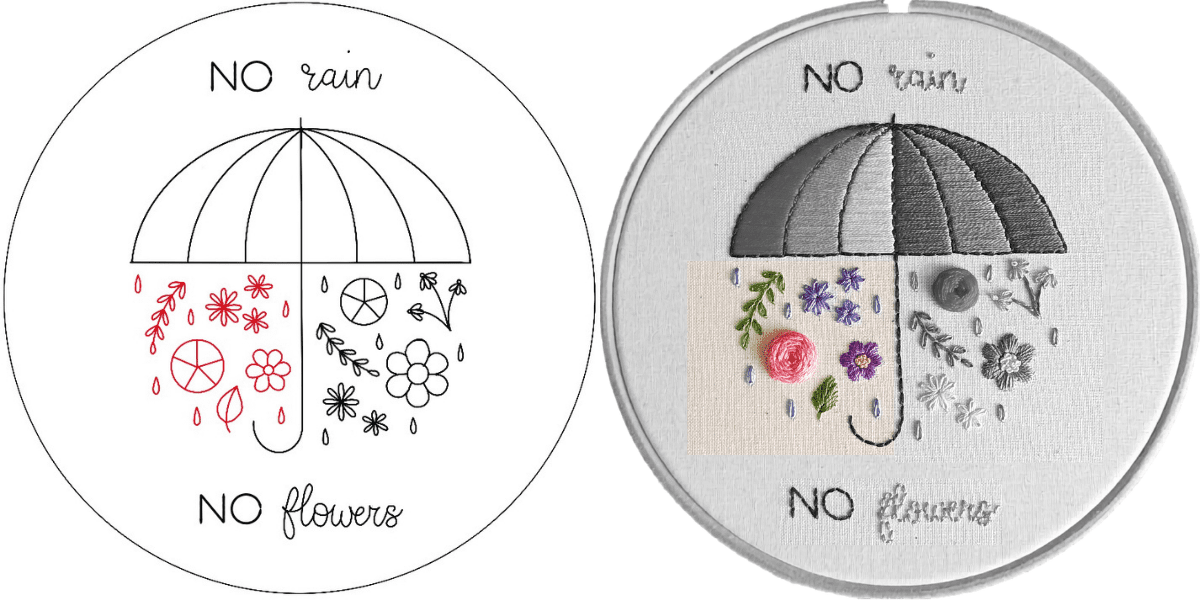
We will start our pattern with the quote: No rain, No flowers.
First, take dark grey DMC 3799, 3 strands, and use back stitch to stitch the two “NO”. Next, we will take blue DMC 813, 3 strands, and back stitch the top word “rain.” Use the pink DMC 603, 3 strands, and back stitch the word “flowers” at the bottom.
Umbrella
Next, we will work on the umbrella.
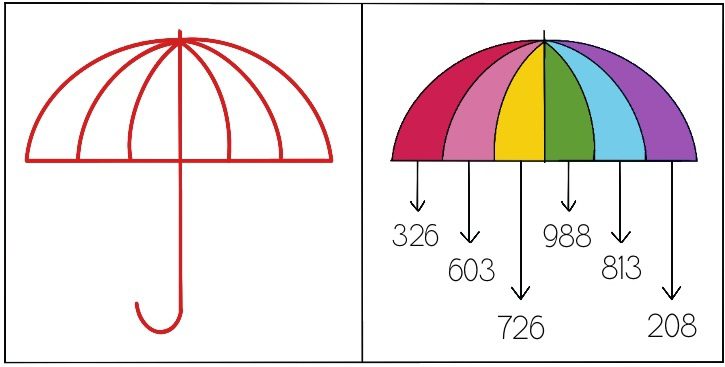
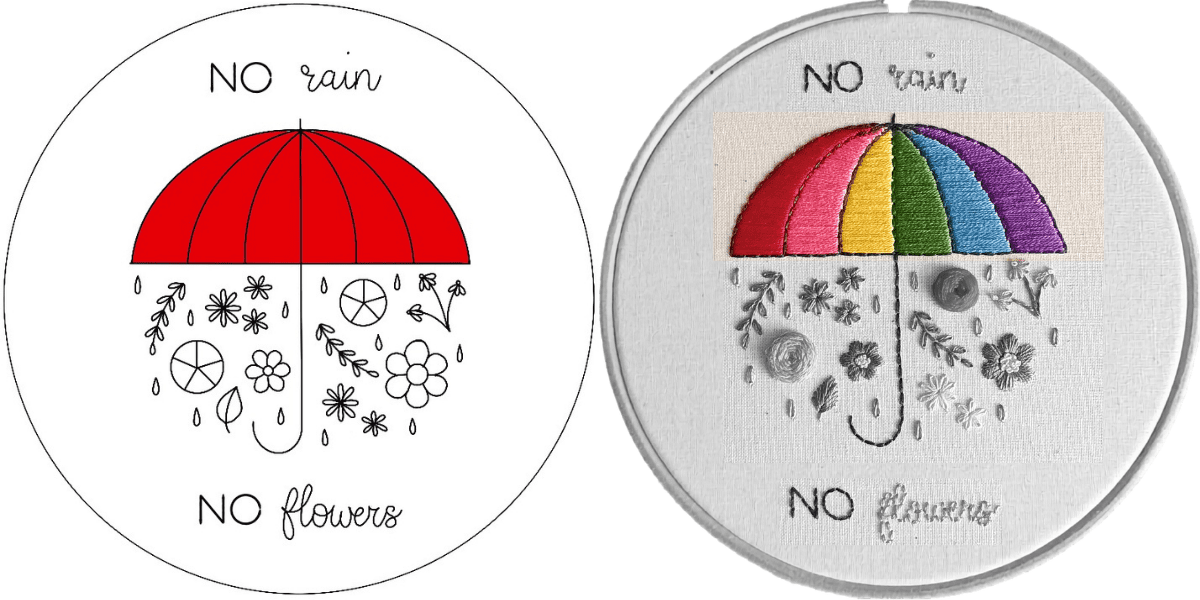
First, take 3 strands of the dark grey DMC 3799, and use back stitch to outline the umbrella shape.
Next, fill the sections of the umbrella using 3 strands of floss and satin stitch with horizontal direction, using these colors in order from left to right: red DMC 326, pink DMC 603, yellow DMC 726, green DMC 988, blue DMC 813, and purple DMC 208.
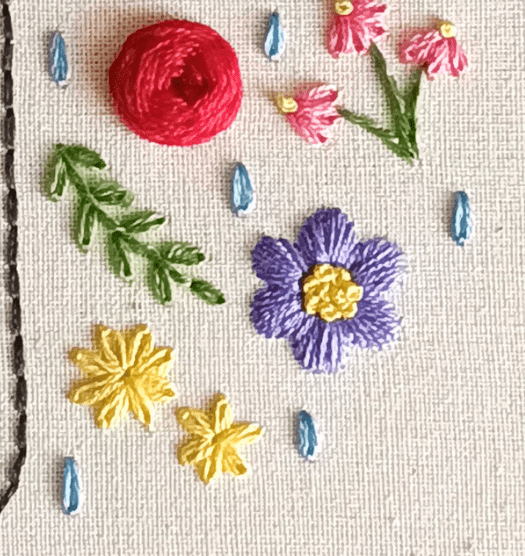
Flowers (left side)
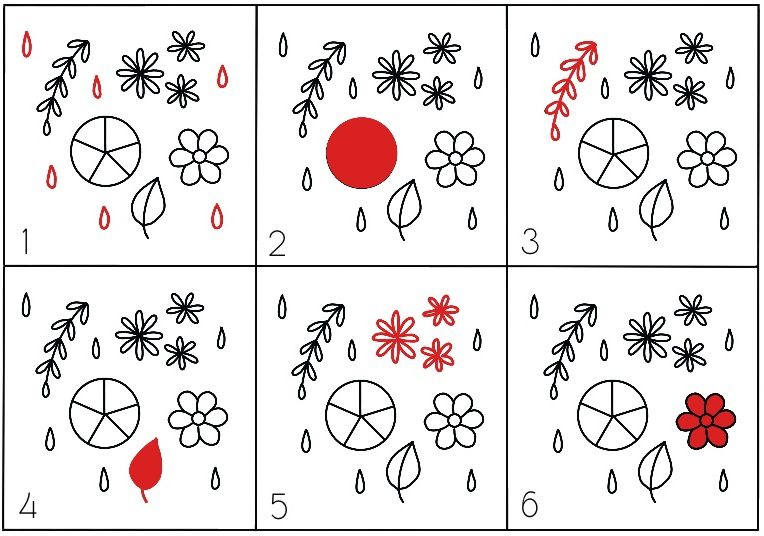
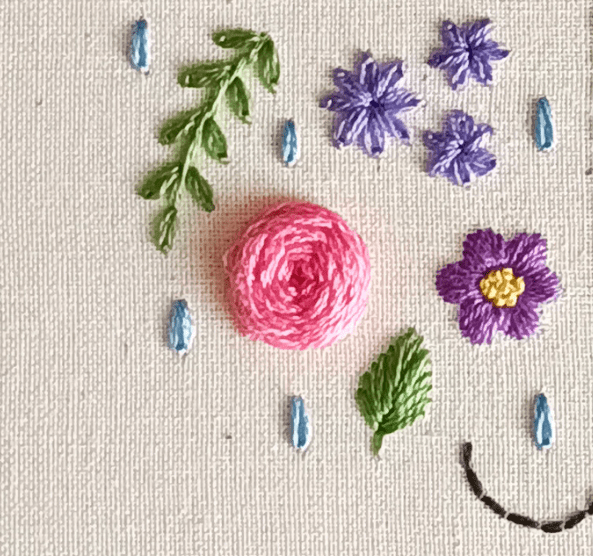
1. Stitch the rain drops with 3 strands of blue DMC 813 using detached chain stitches for each drop.
2. Use 6 strands of pink DMC 603 and stitch the rose with the woven wheel stitch.
3. Use 3 strands of green DMC 988 and stitch the little branch using stem stitch first for the stem, and then individual detached chain stitches for the little leaves.
4. Use 3 strands of green DMC 988 and fishbone stitch for this slightly bigger leaf, plus a straight stitch for the stem.
5. For the small cluster of lilac flowers, use 3 strands of blue violet DMC 155 and detached chain stitch (lazy daisy) for the flowers.
6. For the last flower, use 3 strands of purple DMC 208 and satin stitch for the petals; then use yellow DMC 726, 3 strands, and fill up the central small pollen area with a few French knots (1 or 2 wraps).
Flowers (right side)
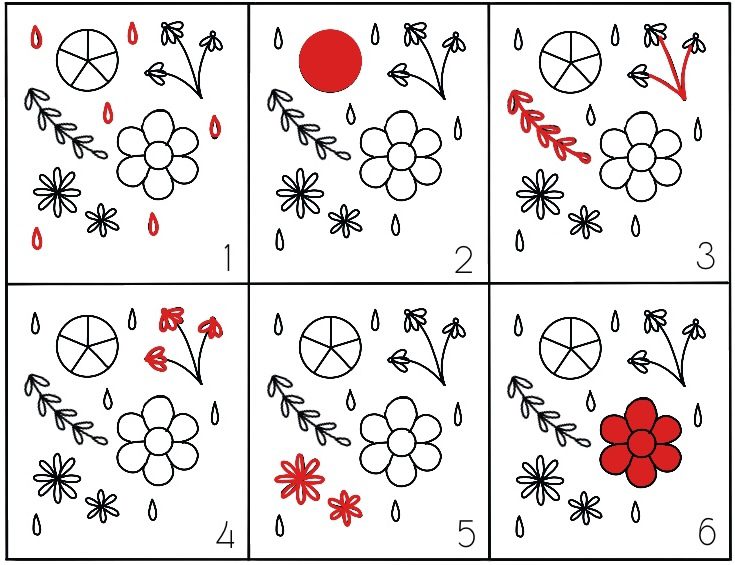
1. Stitch the rain drops with 3 strands of blue DMC 813 using detached chain stitches for each drop.
2. Use 6 strands of red DMC 326 and stitch the rose using woven wheel stitch.
3. Use 3 strands of green DMC 988 and stitch the little branch using stem stitch first for the stem and then individual detached chain stitches for the little leaves. Stitch the stems of the flowers in the upper righthand corner with 3 strands and stem stitch.
4. Finish the small flowers in the upper righthand corner with pink DMC 603, 3 strands, using detached chain stitches for the petals. Use yellow DMC 726, 3 strands, and stitch one French knot for the center of each flower (2 or max 3 wraps).
5. Use 3 strands of yellow DMC 726 and detached chain stitches (lazy daisy) for the two small flowers.
6. For the last flower, use 3 strands of lilac DMC 155 and satin stitches for the petals. Use yellow DMC 726, 3 strands, and fill up the center of the flower with a few French knots (1 or 2 wraps).
Enjoy your colorful embroidery!
Download a PDF with these instructions