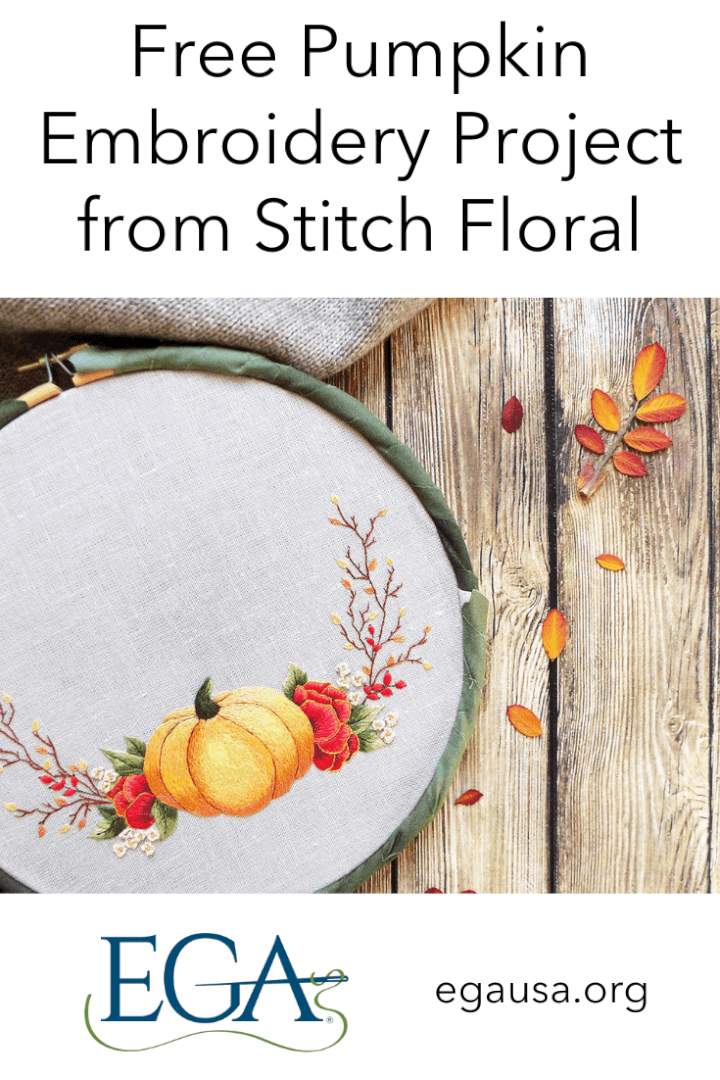
We’ve teamed up with the talented Amina from the Stitch Floral Blog to bring you a new free pumpkin embroidery project for fall. Pumpkin Season uses several embroidery stitches to create a pretty design to celebrate autumn.
Materials and instruments:
- • Pumpkin Season Pattern (Click here to get the chart) (If you are a member all free projects can be downloaded from the Publications page)
- • Fabric of your choice (linen and cotton are typically preferred options)
- • Scissors for needlework and fabric
- • #10 Crewel needle (We will work cast-on stitches in this design and this needle usually works for me but if it doesn’t suit you, try Milliners needle for that purpose)
- • Embroidery hoop
- • DMC cotton floss thread
- • Instruments for transferring design
Stitches you will need:
- • Stem stitch
- • Back stitch
- • Fly stitch
- • Satin stitch
- • Long and short stitch
- • Cast-on stitch
- • French knots
Instructions
When Fall comes, you know that you can expect a pumpkin season! Let’s stitch one of these cuties together with red marigolds and some haw berries!
All work is done with 1 strand of thread.
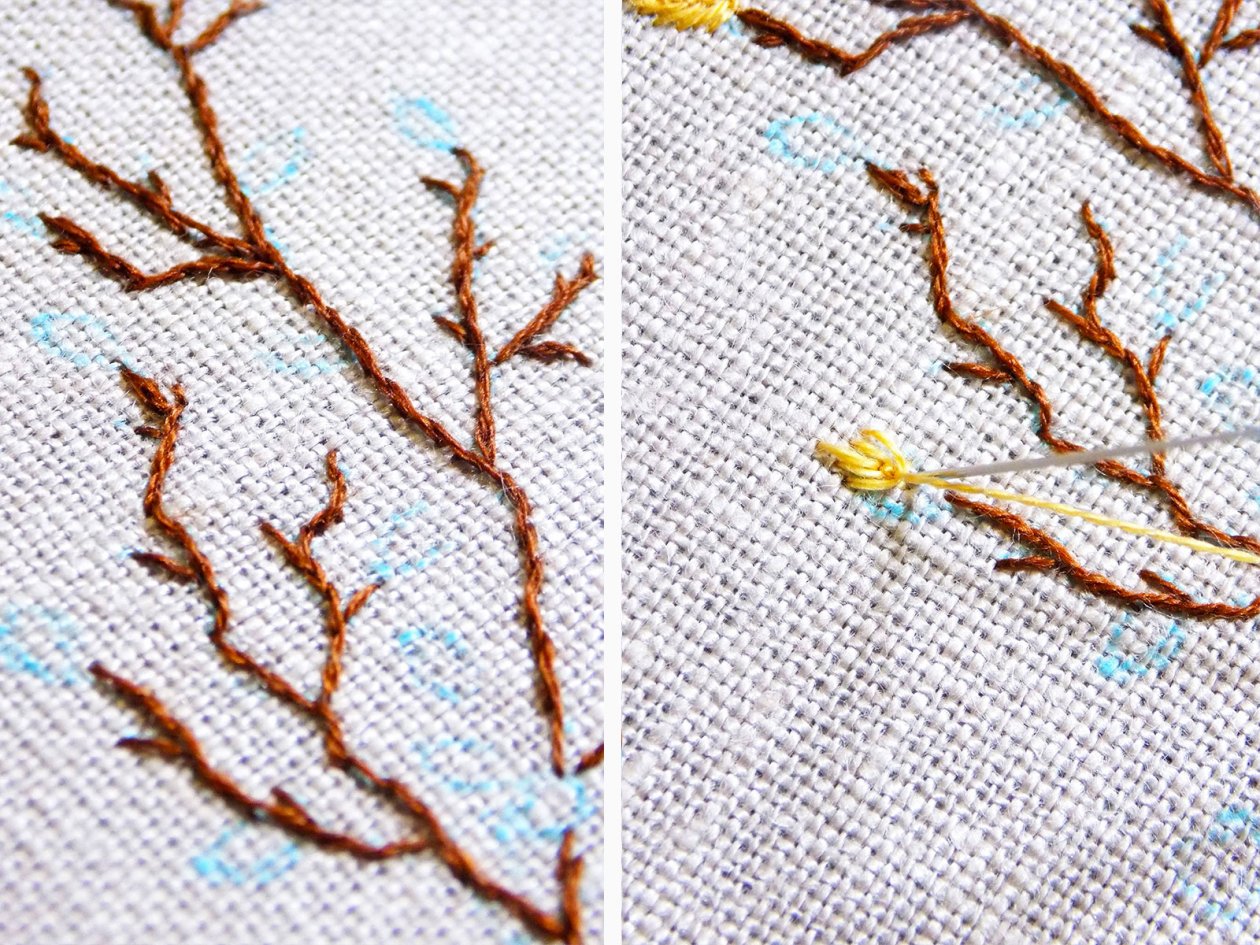
Branches
You can work branches by combining stem stitch together with back stitch in some places where it’s more convenient. In the places with curves and corners, don’t forget to make your stitches tinier to avoid them sticking out. We use DMC #300 for the branches.
When it comes to leaves, use fly stitch in colors #3776 and #3827 according to the color chart. The leaves are small so you will need only 4-5 of stitches placed under each other. You can also work a straight stitch starting from the top if you want to make the leaves’ tips sharper (see the image).
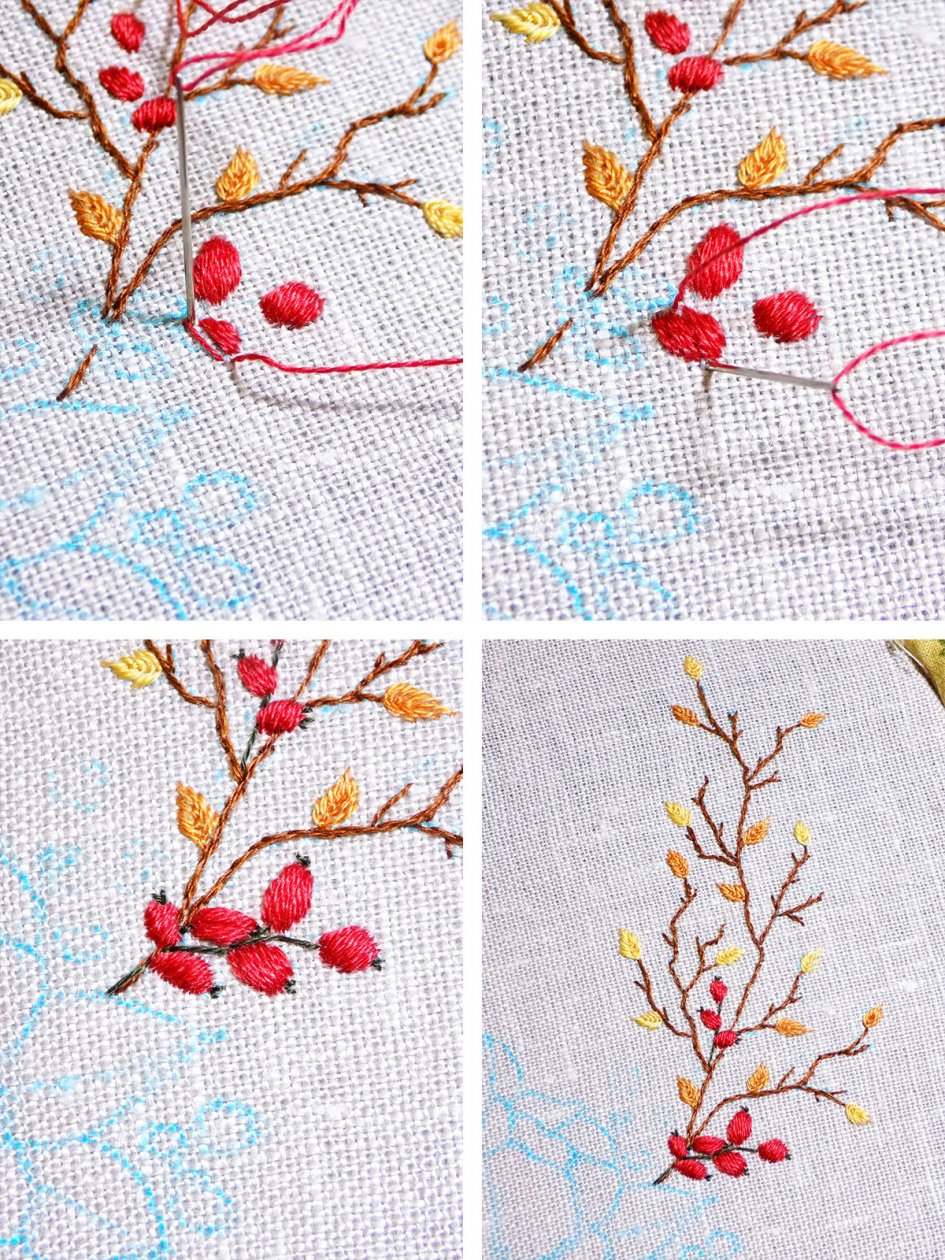
Hawthorn berries
Work these berries by using satin stitch in thread #347.You can outline them in back stitch if you want. However, the shapes are small so be aware of the possible struggle. To make berries more dimensional you can work satin stitch in two or even three layers. To work their stems and small sepals use thread #934. Their stems can be worked in stem stitch as well.
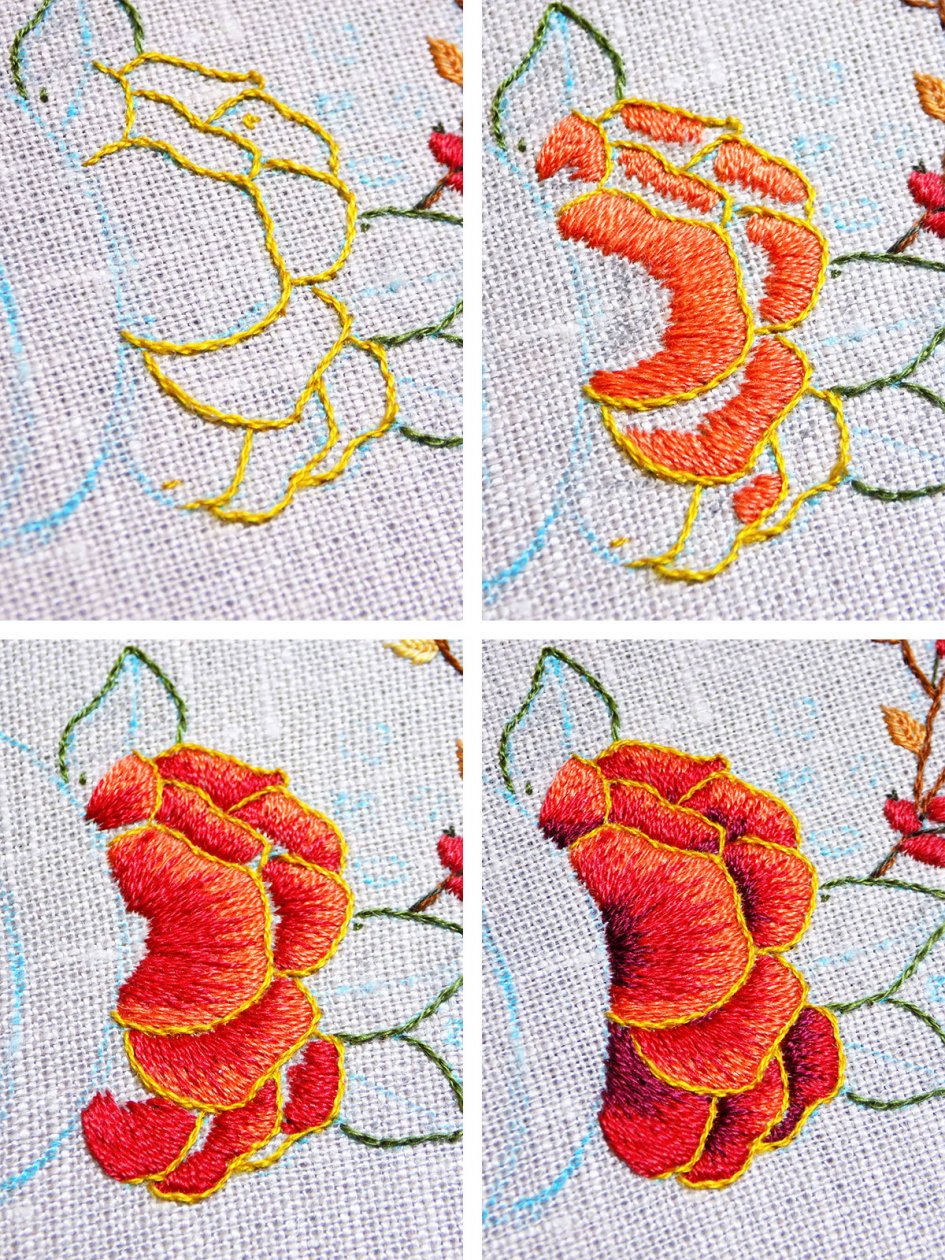
Marigold flowers
Each Marigold flower petal is outlined with stem stitch in thread #783 and filled with long and short stitching in threads #351, 347, 902. Refer to the color chart for better under-standing of colors’ placement.
I preferred working the outline first but if you feel like it, you can start by filling the petals. Remember to maintain consistency in your stitches’ direction when working long and short stitch and try to vary their length more for smoother blending.
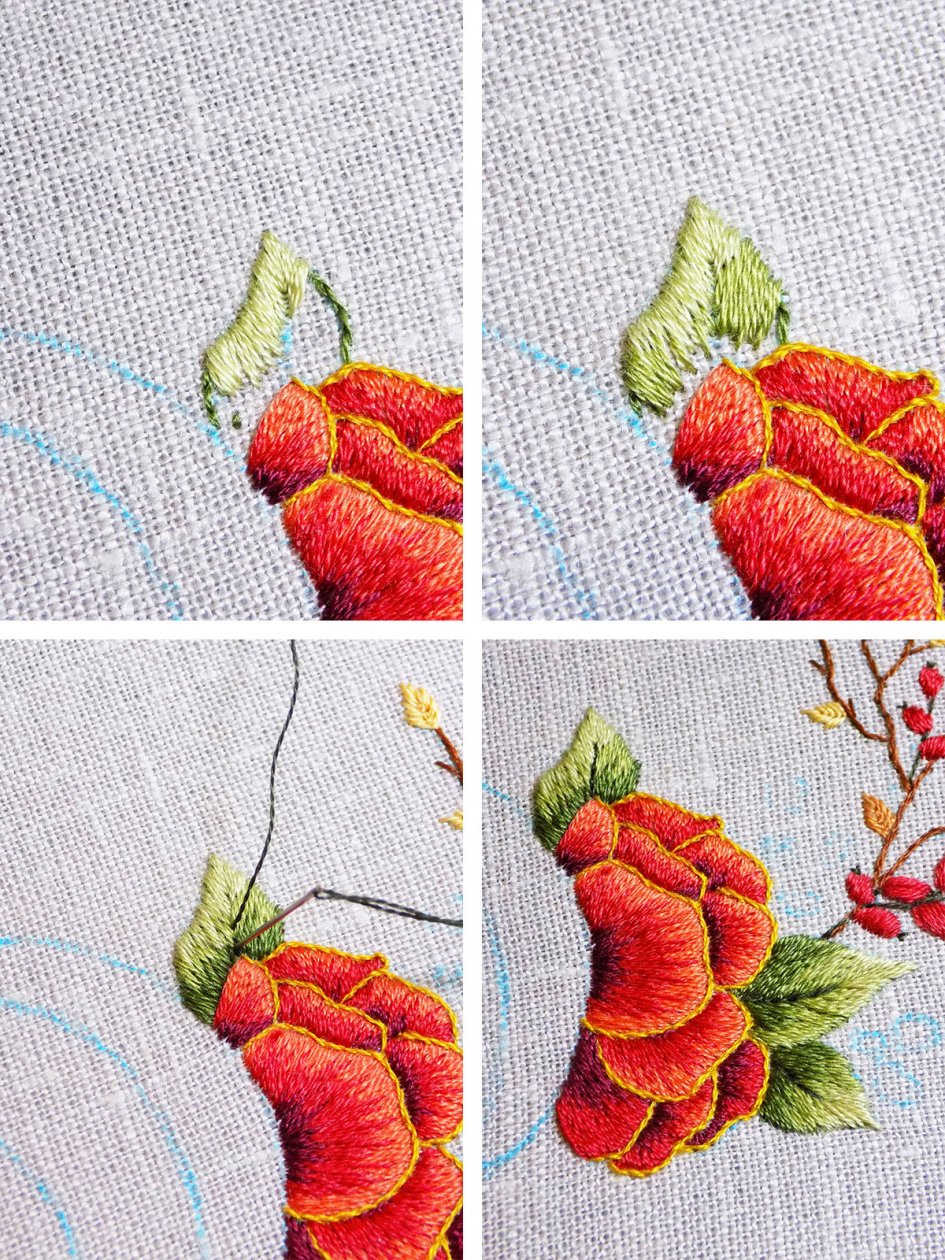
Green leaves
You can prepare to work these shapes by outlining them first in stem stitch. It will help raise the edges and keep them even.
All the green leaves are divided into two halves and worked by slightly slanting your stitches in such a way that their lower points strive to the middle of the shape. Use long and short stitch technique to blend the border between colors. You will need thread # 372, 3012 and 936 for the bodies and #934 for the central vine worked in back stitch.
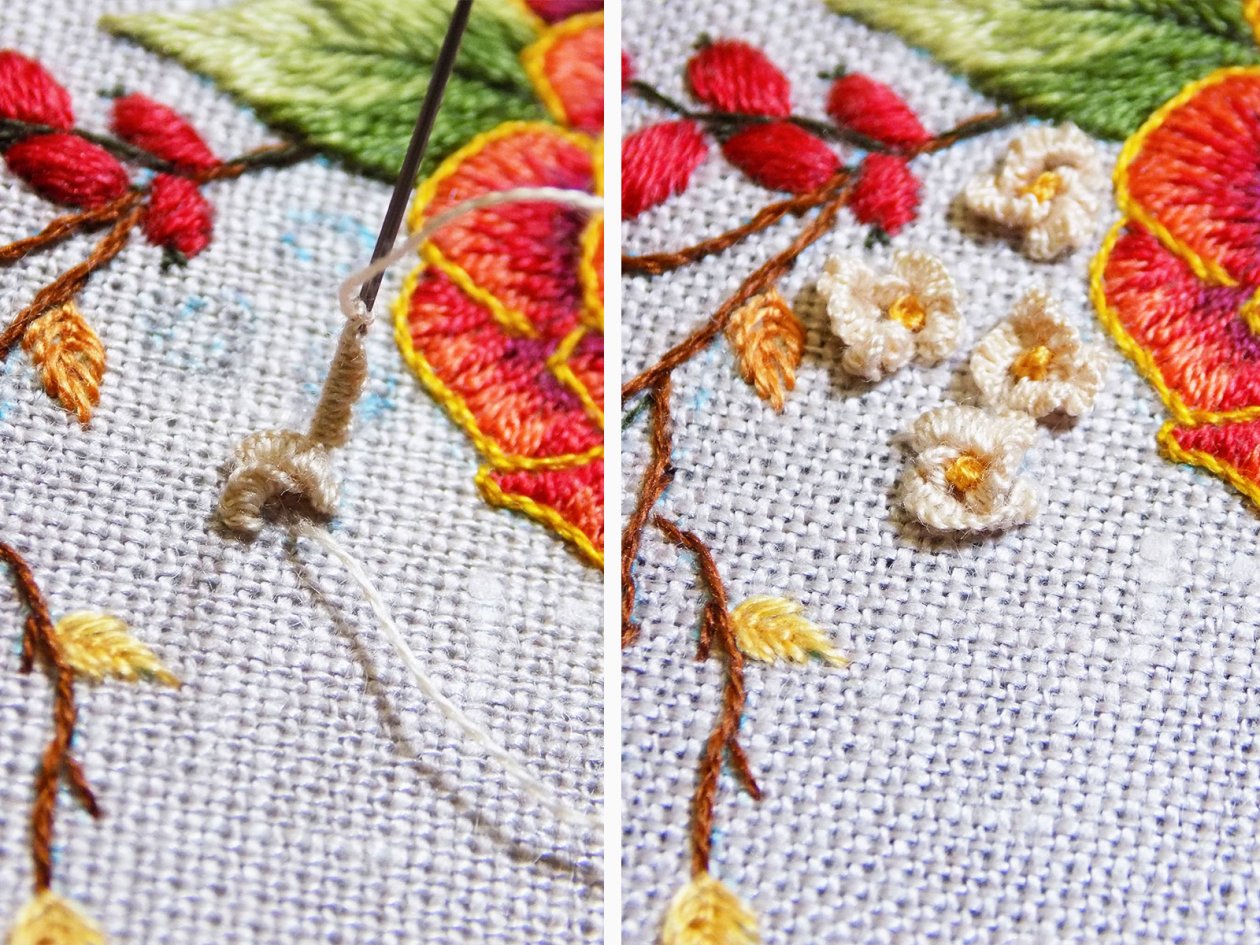
Tiny Flowers
The petals are worked with cast-on stitch in thread #950. As I mentioned in the list of In-struments, crewel needle usually works fine for me when I make cast-on stitches. However, that might not be the same for you. In this case, try Milliners needle.
Don’t forget to make the loops loose enough so that your needle has no problem in sliding through them. Make 3-4 petals for each flower, placing them in a circle. I like starting mine behind one another and finishing them striving to the center. It might be a little chaotic but I think it only makes them look more natural.
However, you can work them in a horse-shoe shape, meaning you place the starting and ending points close to each other and make a lot of loops so that when you slide the needle through it forms a high arc.
Place French knots in thread #977 in each flower center.
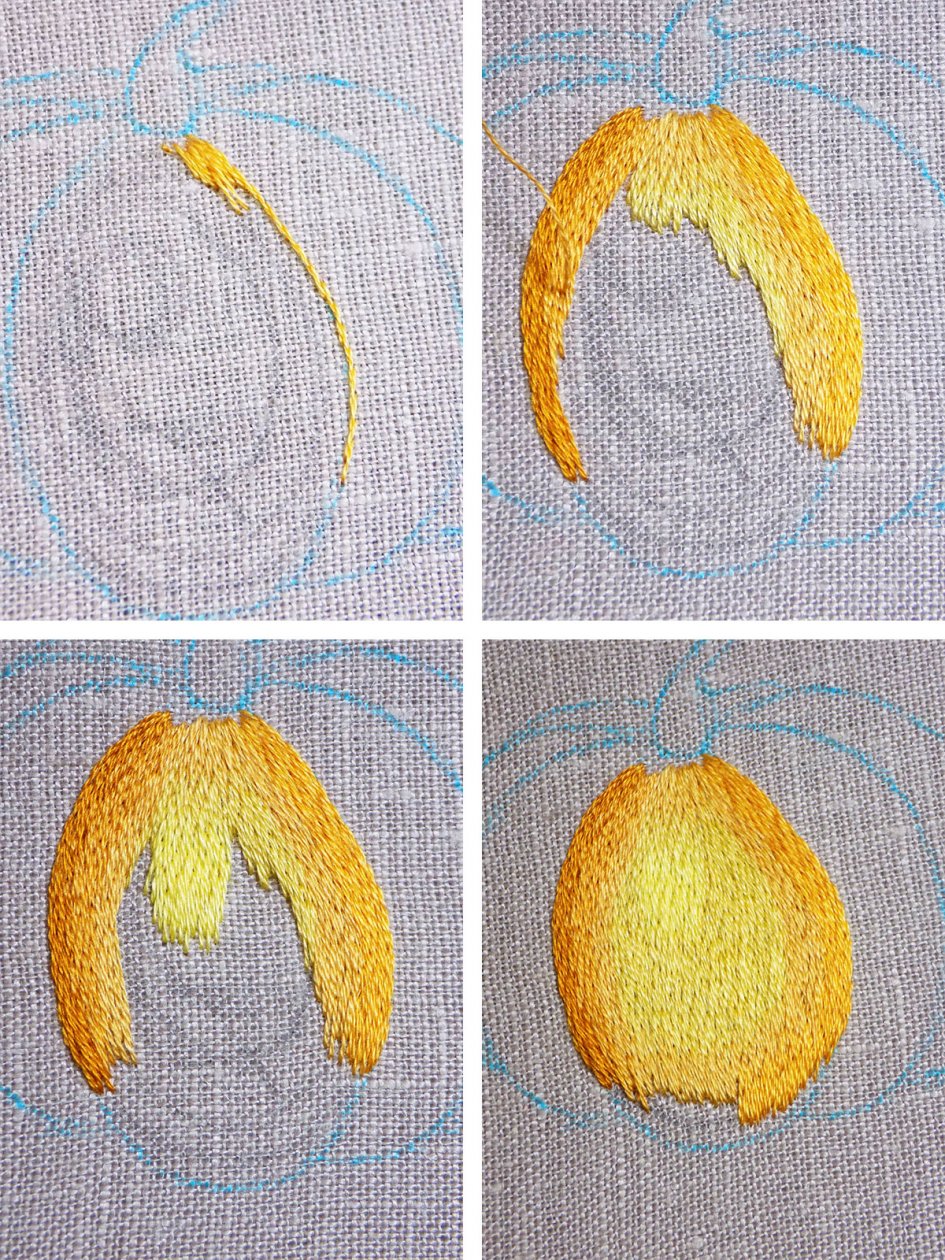
Pumpkin
The most complicated part of the Pumpkin is its front side so I suggest starting there to get through this challenge quickly.
You don’t have to use an outline here in its common way, but I encourage working stem stitch lines on the sides to still keep it neat there. And then you can start filling the shape with long and short stitch.
Refer to the color chart for better understanding of colors’ placement.
My suggestion regarding the order of work is to fill the shape on the right and left first, since these colors are placed in a stripe-y way. Work them up to the point where the shape starts narrowing down. Then work the middle part and start “closing” it from below by continuing the previous colors’ areas.
Or just go from the top to the bottom by working several colors at once. When you don’t need a thread, leave it on the surface of the fabric until you need it again.
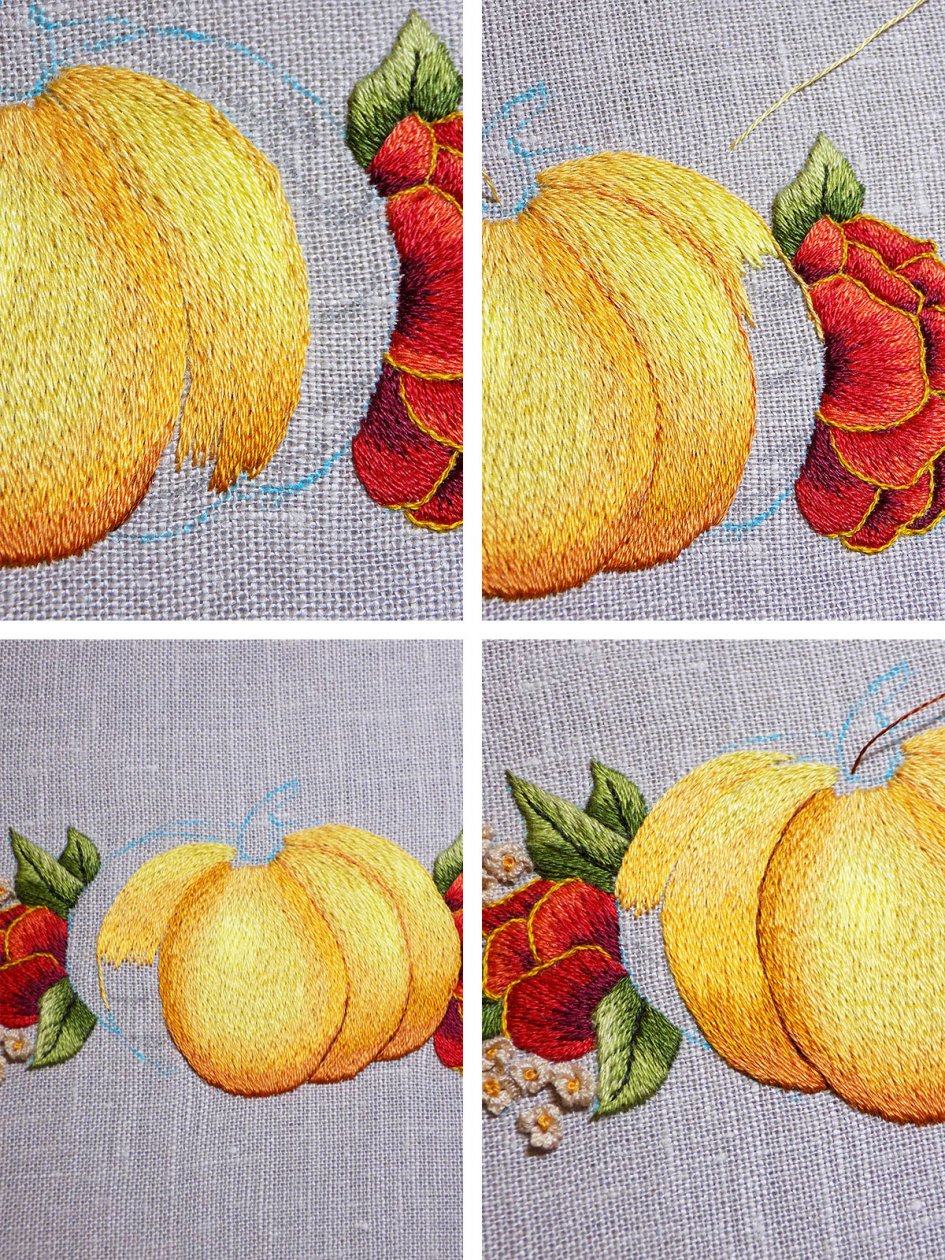
On the sides, colors are placed mostly one under another, so you can work them gradually from the top to the bottom. Between each rib you can work a line in #3776 and add some stitches in #300.
Since we work long and short stitch in soft arcs and almost half-circles, keep in mind to make your stitches rather small. If you make them long then it will be harder to achieve smooth “movement” of stitches and they will stick out. Slant them little by little to adjust to a new direction.
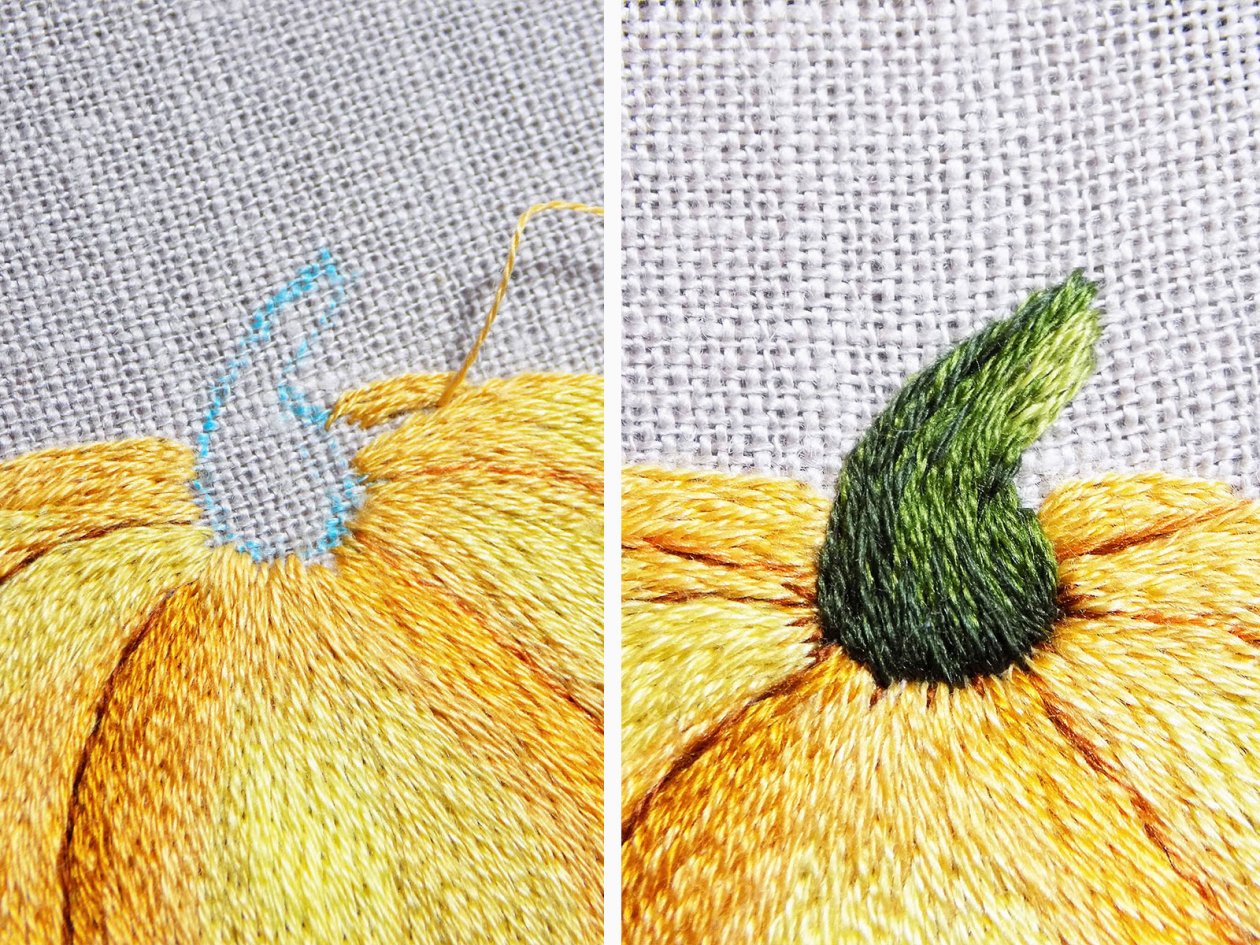
The two furthest ribs can be worked in horizontal long and short stitch. The stem is also worked in long and short stitch. Add some tiny stitches in darker colors (#300, 3776 and 976) around the stem to add a bit of depth.
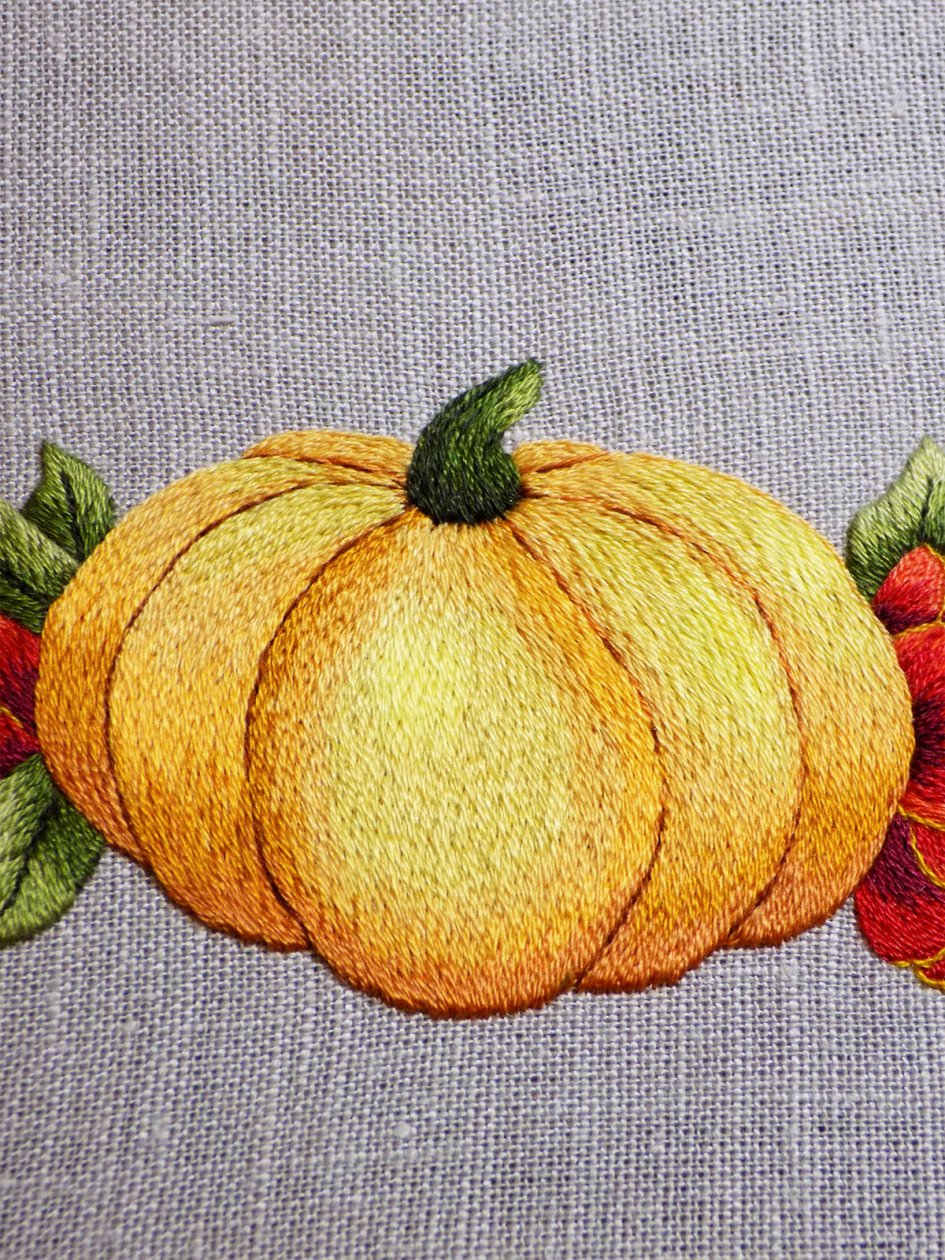
And the Pumpkin is ready!
Congratulations, you worked hard! We’d love to see your projects, make sure to share your photos with us on social media and use #EGAstitchers in your post!
Like this post? Pin It!