EGA Group Instructions
-
What are Groups?
While your Profile is where all your personal information lives, Groups are the place in our website where stitchers can come together and interact, share their work and communicate with others about a wide variety of embroidery-related topics.
Groups are a great option for chapter and regions to keep their members informed as they allow for members to receive emails of any activity posted.
All EGA members can join public groups on the EGA website. In order to join a group, members will need to be logged in. If you need help logging in, please Contact Us. Members will be able to join Private and Hidden groups based on the requirements of groups with those privacy settings.
-
Where are Groups located?
There is a link to the EGA Group Directory on the navigation under Resources.
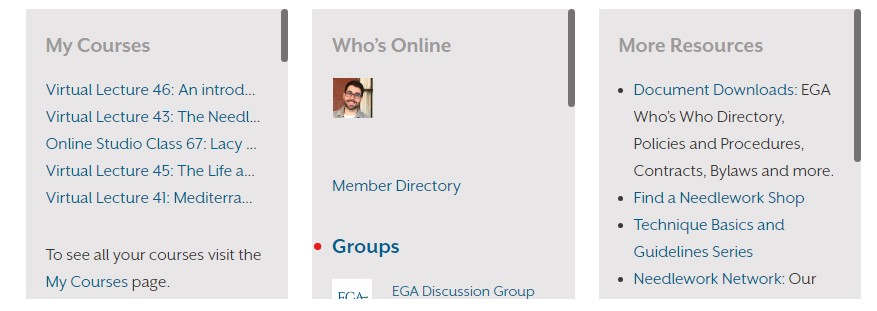
The five Groups with the most recent activity will show on your profile under the Who’s Online section. To see all groups, click the Group Directory link below the groups.
-
How do I join a group?
There are several ways to join a group:
You can join a group by clicking on its name from your Profile and then clicking the Request Membership link that appears on the group’s page.
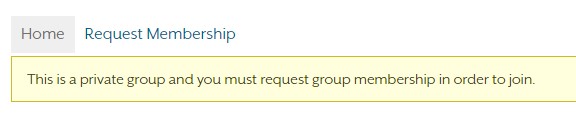
You can also join groups from the Group Directory by clicking the Request Membership link that appears on the right of each Group. This is also how you can leave a group.
-
What can we do in a group?
Group members can do all of the following in a group:
Post updates, questions, comments: Simply enter text in the box, and click Post Update.

Post pictures: Including a picture on your post is a great way to share your work, ask for feedback or get answers to questions you may have.
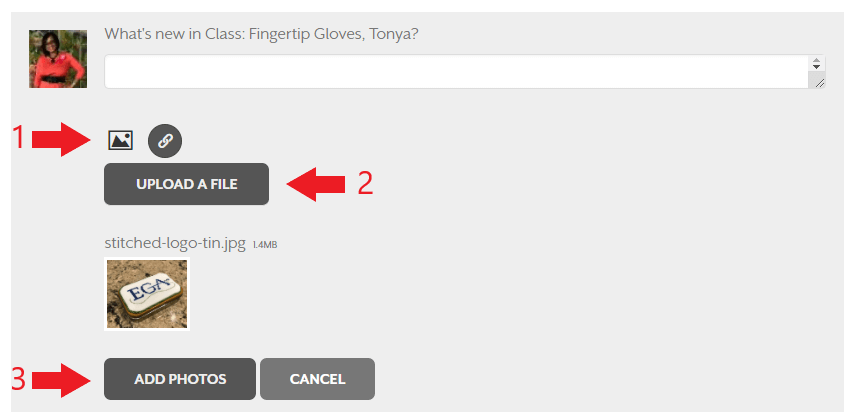
To post an image, click the Image Icon(1) below the comment, the window will expand and you will be able to choose an image from your computer by clicking Upload a file(2). After choosing your file, it will upload and appear below, now make sure you also enter text on the comment box so other group members will have some context, and click Add Photos(3). You’re now done posting a photo!
Mention others: If you are directing a comment or question to someone else and want to make sure it’s not missed, you must mention others in your post by typing @ followed by their name, you should see the name pop up as you start typing, letting you click on it as in the image below.

Reply to others: To reply to someone’s post click on the Comment button below their post. You can also mention others and add images to your replies.
Favorite posts: Let’s say you see someone’s update or picture and would like to save it to see it later, or for any other reason, you can do this by clicking Favorite below that specific post. This will save the post to the Favorites section on your Profile where you can easily access them at any time.
Stay informed: Every group has several email and notification options that allow you to stay informed and up-to-date the latest activity in the group.
A default email setting is established by the group creator and assigned to every member who joins the group. Group members have the ability to update the frequency in which they receive emails from a group at any time.
To update your email settings from inside any group click Email Options.
This will open an Email Options page where you will be able to choose from the following email options:
No Email: You will receive no emails and will have to read the group on the website.
Weekly Summary Email: Get one email per week, summarizing the new topics each week.
Daily Digest Email: Get all the day’s activity bundled into a single email. (Default)
All Email: Send all group activity as it arrives. You will receive an email every time someone posts to the group.When someone mentions you directly or comments on one of your updates a notification will appear in your Profile.
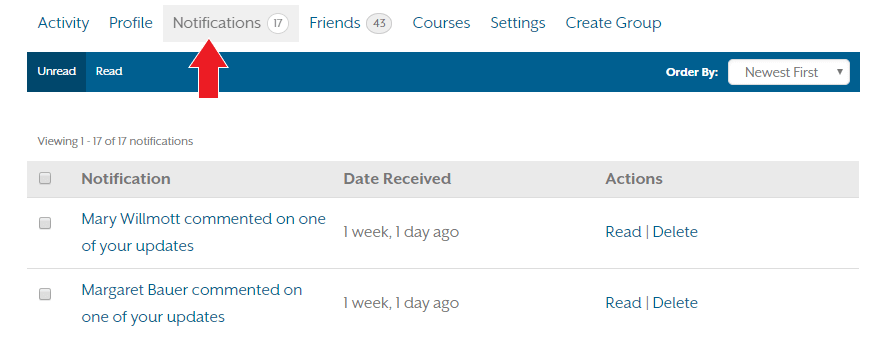
To see the notification click on the notification name. (e.g. ___ mentioned you). The actions Read and Delete are to ‘mark as read’ and ‘delete’ the notification respectively. Delete will only delete the notification, not the original post or reply.
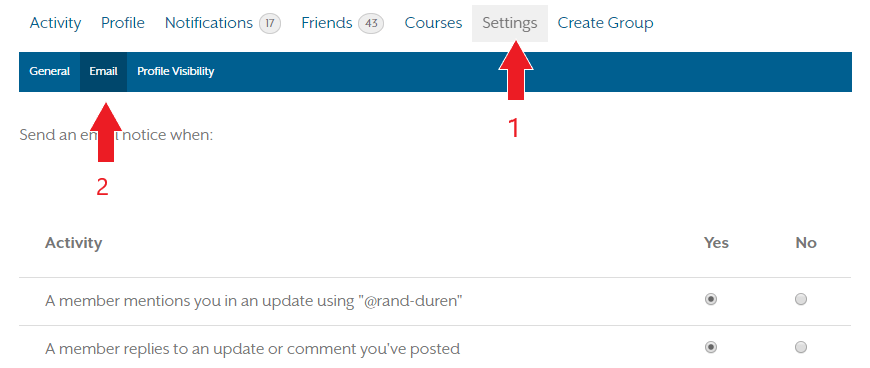
You will be notified by email when you receive a notification. If you would like to stop receiving notifications or change the type of notifications you are receiving, click on Settings(2) at the top of your profile, then click on Email(2).
Invite friends: When in a group, clicking on Send Invites at the top will allow you to invite others, who you have already added as friends, to your group. To add a friend you can visit the Member Directory and click Add Friend below the name of the person you want to add as a friend.

-
Creating a Group
Who can create a group?
Any EGA member can create a group on our website as long as the group is connected in some way to needle work. Members are encouraged to visit the Group Directory before creating a new group in order to avoid duplicating groups on specific topics or techniques. If a group already exists in the technique of interest, members are encouraged to join that group instead of creating a new one.
All groups and activity on the EGA website are subject to review and can be removed by the Electronic Media Coordinator and/or EGA leadership.
Official chapter and region groups will need to be created by chapter/region representatives or someone from that chapter or region. Please notify the Electronic Media Coordinator when your group is created so a link to it can be added on your chapter listing in the Find a Chapter page.
How do I create a group?
You can create a group by clicking Create Group on the top bar of your profile.

You will be prompted to provide the following information when creating the group:
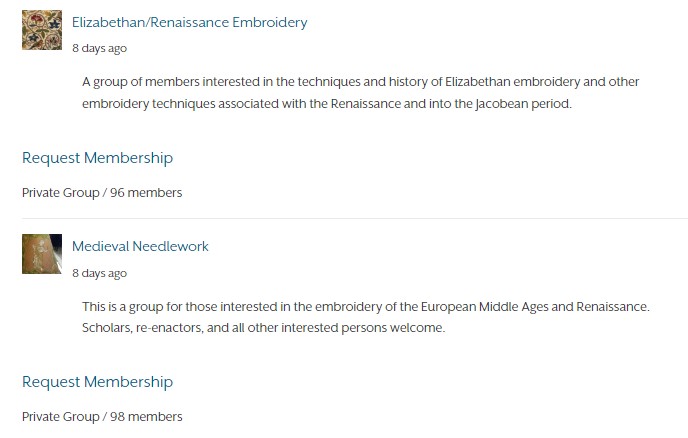
Group Name: Make sure the name of your group states the main topic that will be discussed in this group and try to keep it to around 20-25 characters. Examples: Elizabethan/Renaissance Embroidery, Medieval Needlework, Ta-DAH! I finished it!.
Group Description: Give visitors a quick description of your group so they will know what they can expect to see in this group, or the main topics that will be discussed. If this is the official group for a chapter, region, class, etc. please make sure to note it in this area.
Privacy Options: Here you will choose from three privacy options based on the needs or purpose of the group
Public group: Ideal for topics that will interest a wide range of members. Any site member can join this group. This group will be listed in the groups directory and in search results. Group content and activity will be visible to any site member.
Private group: Ideal for chapters and regions to communicate with their members. Only users who request membership and are accepted can join the group. This group will be listed in the Groups Directory and in search results. Group content and activity will only be visible to members of the group.
Hidden group: Ideal for more specific topics where a user has to be invited to participate (Planning, Leadership, Certifications, Master Craftsman, ESPs, Fiber Forum). Only users who are invited can join the group. This group will not be listed in the groups directory or search results. Group content and activity will only be visible to members of the group.
Group invitations: This will allow you to select which members of the group can invite others: Options are: All group members, Admins and Moderators only and Admins only.
Email subscription defaults: This setting will allow you to set a default on the type of emails that members of this group will receive. Members will always have the option to update their email settings for any group they are part of. You will be able to choose one of the following options:
No Email: You will receive no emails and will have to read the group on the website.
Weekly Summary Email: Get one email per week, summarizing the new topics each week.
Daily Digest Email: Get all the day’s activity bundled into a single email.
All Email: Send all group activity as it arrives. You will receive an email every time someone posts to the group.Main Photo: Every group should have a profile photo that is directly related to the group’s main topic. Your main profile photo that will show everywhere your group is displayed.
Invites: When creating your group, the last section will allow you to invite people to the group. However, the only people you can invite in this step will be those that are already your friends. Other ways of inviting members to your group can be found below.
-
Ways of inviting others to your group
Once your group is created you can start inviting other EGA members.
If your group is a Public group you can share your link virtually everywhere, even in emails and social media. When people click on it they will be able to see the posts on the group, but will only be able to participate and post if they join the group. To share your public group just grab the web address to your group from your browser and share it.
If your group is a Private group, you will still be able to share your link everywhere but in order to see the group’s activity and participate people will have to request to join. Private groups will still show on the group directory and everywhere groups show, so members will be able to request to join from everywhere they can access the group.
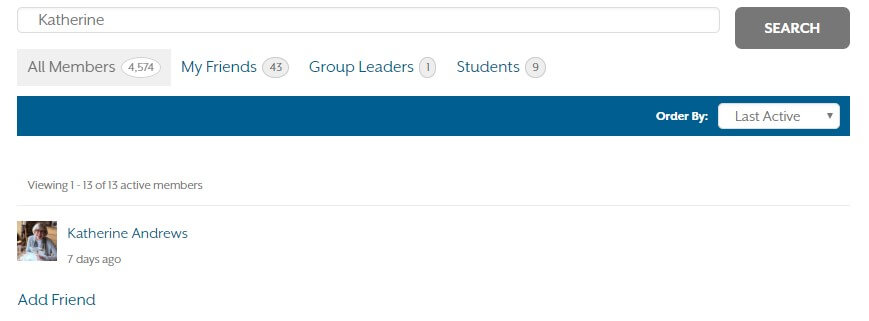
If your group is a Hidden group you will have to manually invite others to the group. In order to do this, you will need to first have those members as friends on your profile. The easiest way to add other members as friends is clicking on the Member Directory on the left sidebar of your profile. This will show you a list of everyone who is an active member of the website and a search bar you can use to find people by name. To add someone as friends just click Add Friend to the right of their name. Once they approve your request they will be added to your friends list and you will be be able to see them in the Send Invites section of your group.
Managing your group
You can update your group’s name, description, profile and cover photo, and email options by clicking Manage on your group’s top bar. After clicking Manage, the blue bar will be populated with sections you can manage.

After clicking on Manage, clicking the Members link in the blue bar will allow you to manage members of your group, allowing you to remove people from the group, or promote them to admin or moderator.