EGA is excited to present a new series of free project tutorials under the heading, “Outside the Hoop.”
As its name suggests, the Outside the Hoop series will focus on entry-level projects that take stitchers outside of the traditional embroidery hoop. Prepare to explore beading, mending, and other styles of needlework that may utilize techniques familiar to stitchers—but without the hoop!
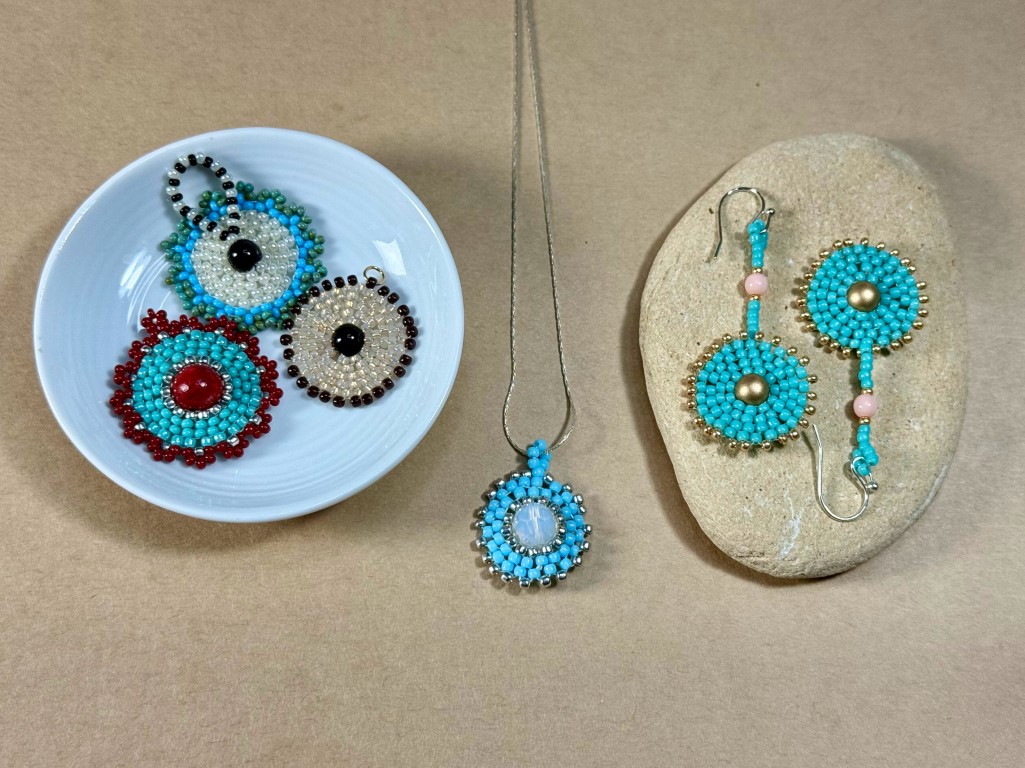
Our first entry in the series comes to EGA courtesy of Lisa Yang of Lisa Yang Jewelry. Lisa has written a book, Wire Wrap Jewelry Making for Beginners, and hosts beginner tutorials on beading and jewelry making on her website, Lisa Yang Jewelry. Her tutorial for Colorful Beaded Medallions is the perfect introduction to making beaded jewelry for beginners to beadwork techniques.
Colorful Beaded Medallions
Beadwork, much like embroidery, is built on a foundation of basic stitches and their variations. In this tutorial, you’ll learn a versatile and beginner-friendly technique called brick stitch. This stitch arranges beads in an offset pattern, resembling the way bricks are stacked in a wall. You’ll be using a variation known as circular brick stitch to create a round, medallion-style design—perfect for jewelry. These instructions demonstrate how to create a medallion with brick stitch, add an optional decorative edge plus a bead loop to attach the medallion and weave in thread ends.
I chose this project because it brought me endless joy when I first started beading — and years later, circular brick stitch still inspires me. Its versatility in color, size, and shape means each piece can reflect your own creative vision.
You’ll find more free beadwork stitch tutorials, patterns, and wire jewelry projects on my website: Lisa Yang Jewelry.
Skill Level
Beginner
Materials and Tools
- Nylon or fishing line style beading thread
- Size 12 beading needle
- 6- or 8-mm smooth round or faceted glass beads for the medallion center
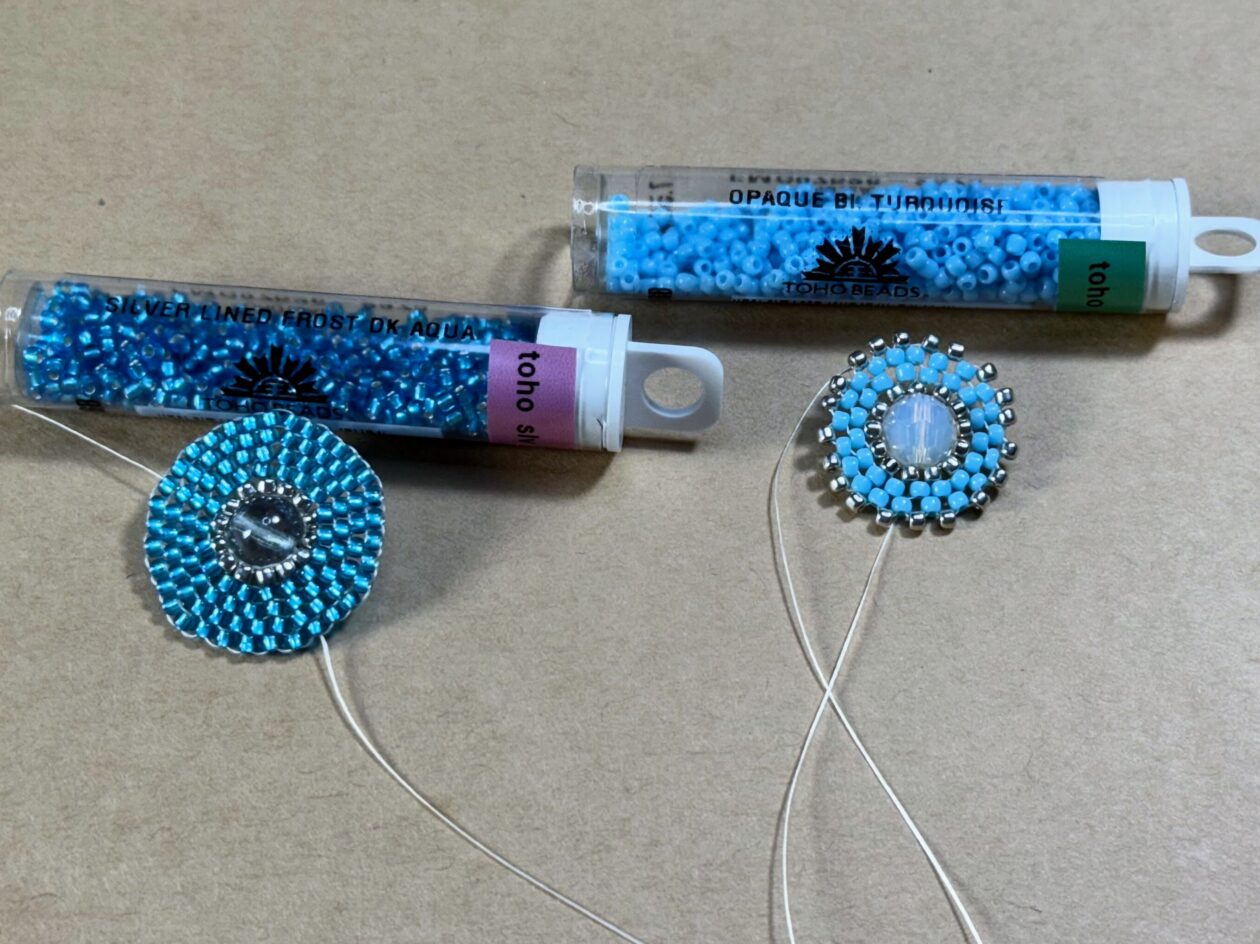
- Toho, Miyuki or Preciosa size 11 glass seed beads in multiple colors
- Scissors or thread snips
- Magnet to hold your needle when not in use
- Beading mat or tray, small bowls for beads
See this article for detailed information Tools and Materials to Get Started Beading
Techniques
- Circular brick stitch
- Decorative edge picot
- Beaded hanging loop
- Finishing thread ends
Circular Brick Stitch
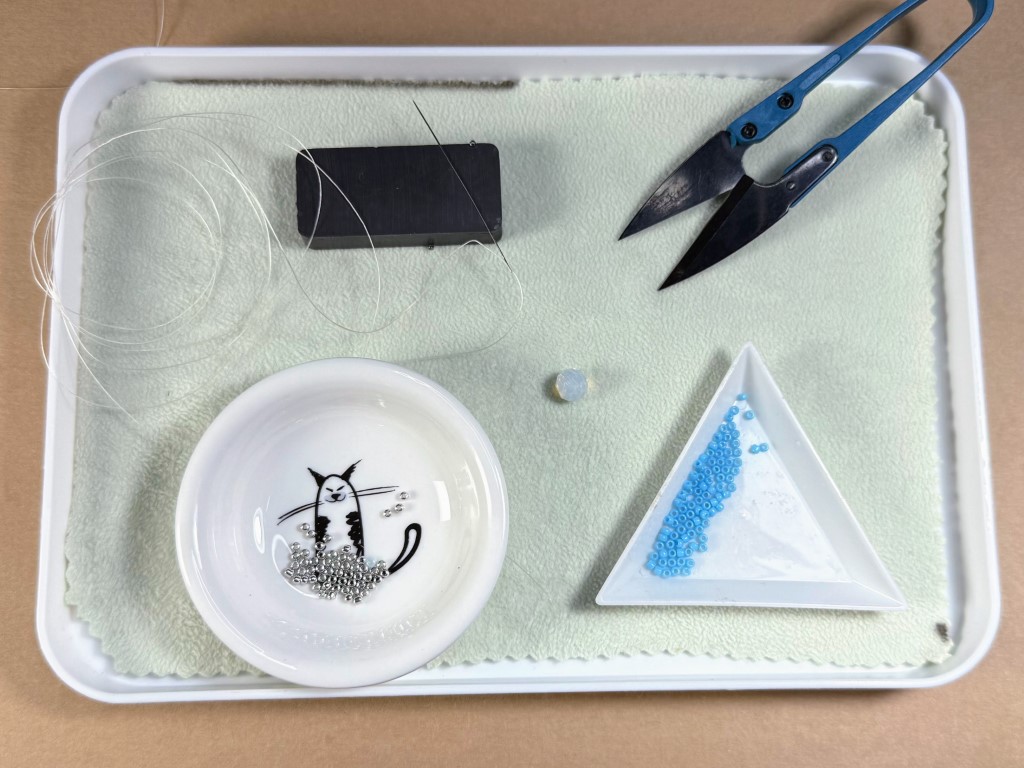
Begin by gathering your materials. Use a small tray lined with low-nap fabric to keep beads from rolling and have small dishes ready to sort your beads. A magnet helps keep your needle secure and easy to find.
Cut a piece of beading thread between 36 to 60 inches long, depending on the size of your project. Use a longer thread if your medallion will have a larger center bead or more than 3–4 rounds of beads. Pre-stretch and condition the thread if desired, then thread your needle.
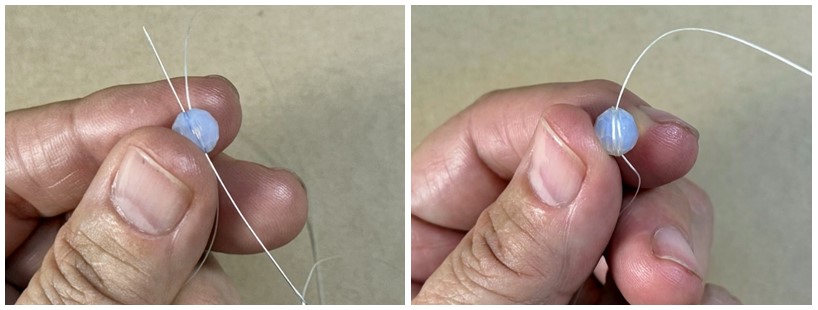
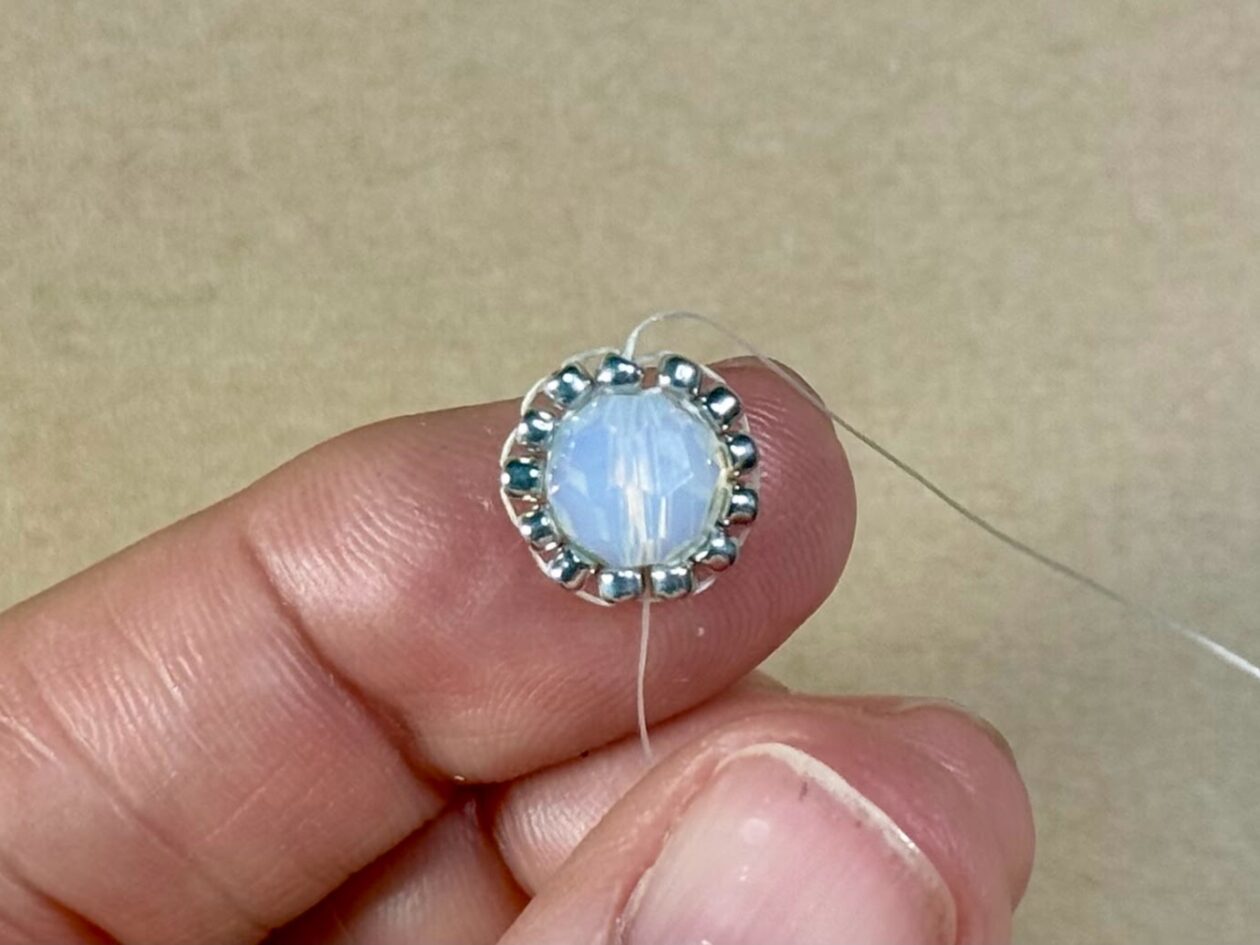
Brick stitch attaches beads to a bridge of thread. This step creates a thread bridge surrounding the center bead.
String your round center bead, leaving a 5-inch tail of thread below it. Pass the needle back through the bead in the same direction to loop the thread around one side. Repeat this step to loop the thread around the other side of the bead. Repeat two more times, alternating the side the thread wraps around until you have two thread bridges on either side of the bead.
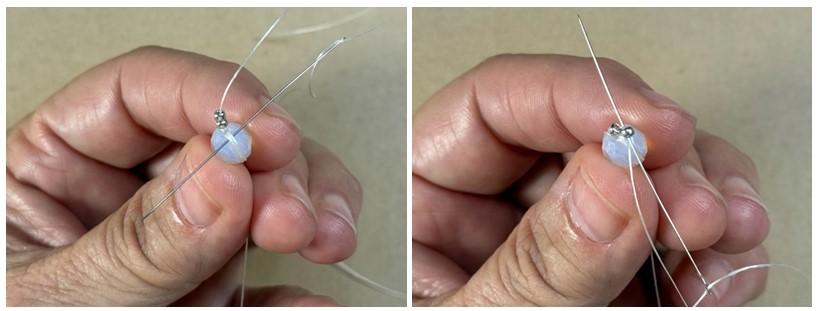
Pick up 2 seed beads and slide them down next to the center bead. Stitch under both thread bridges by passing your needle underneath them, then pull the thread through.
Spread the two beads apart, so they sit on the thread bridge you just stitched under. Pass your needle up through the second bead you just added. Pull your thread through to secure it in place. The first bead will be anchored when you complete the round of beads.
Flatten the first two beads against the thread bridge – your first stitch is complete!
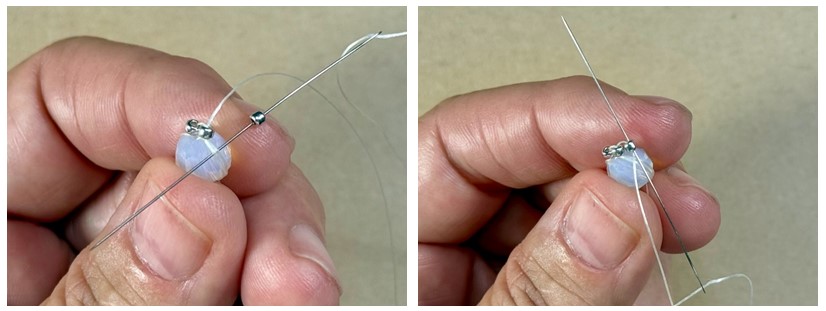
For each new stitch, pick up one seed bead, pass your needle under the thread bridge, then go back up through the bead you just added. Continue this pattern around the center bead. When you reach the halfway point at the bead hole, begin stitching under the thread bridges on the other side of the bead.
Close the round of circular brick stitch by passing the needle down the first bead you added, under the thread bridge and back up through the bead.
The first round is complete. Adjust the spacing of the beads by gently sliding them along the thread bridge using your fingers or an embroidery needle.
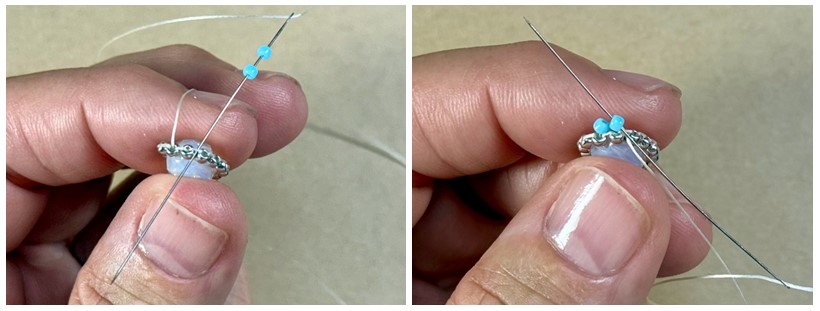
For each new round, start the first stitch by adding up two beads and pass the needle under the second thread bridge between the beads on the prior round, then pass up through the second bead. For the rest of the stitches, add one bead per stitch.
To increase the size of the medallion and maintain a flat shape, you will occasionally add two stitches under a single thread bridge. If adding a bead to the next thread bridge results in a gap or the bead is pulling to the side, add the bead to the same thread bridge as the prior one. This is usually needed every 3-5 beads.
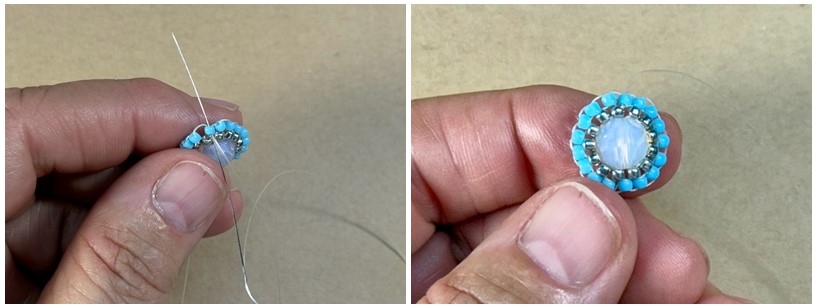
Complete each round of beads by passing down through the first bead of the round, under the thread bridge and back up through the same bead.
Add as many rounds as you like until the medallion is the desired size. You can leave the edge plain or add a decorative edge (pictured on the right). To skip the edge embellishment, jump to the next section to add a beaded loop to hang your brick stitch medallion as a pendant or add to findings for earrings.
Decorative Edge Picot (optional)
The single bead picot edge is decorative as well as practical, since it covers the thread on the outer edge of the medallion, protecting it from wear. For other types of edging and instructions, see this article Bead Edge Variations for Circular Brick Stitch at my website.
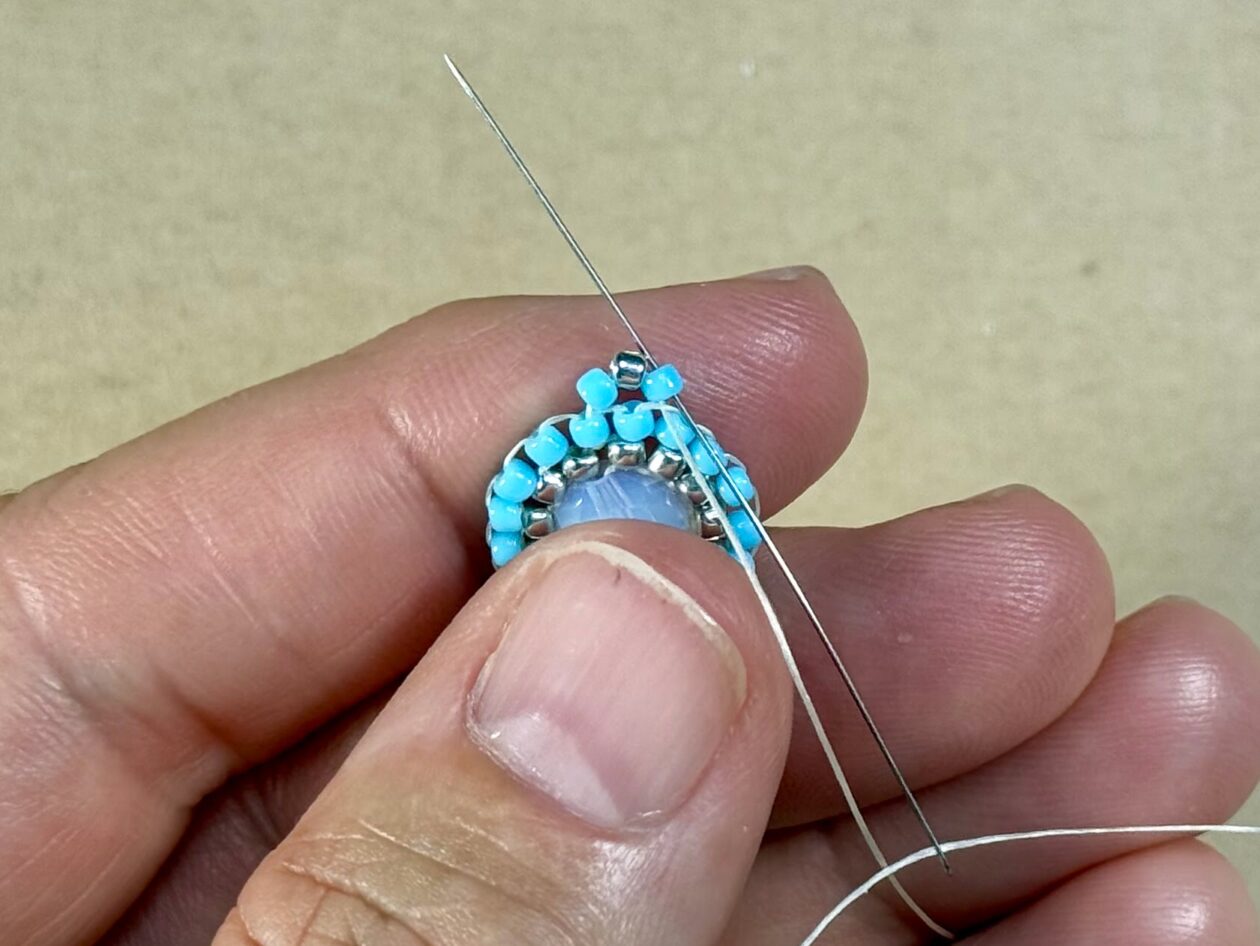
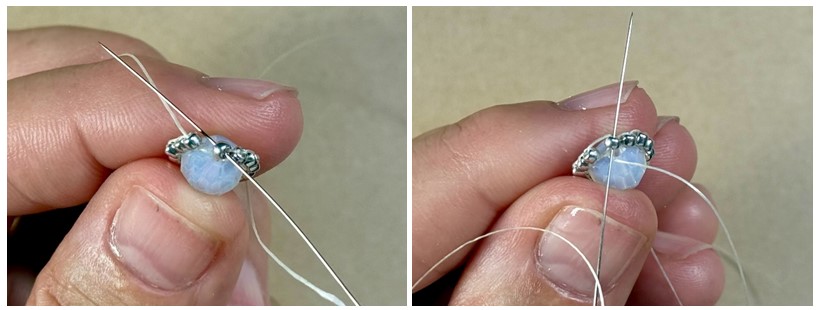
To begin the decorative edge, pick up three beads. The middle bead will form the edge, while the first and third beads start the next round. Stitch under the second thread bridge, then go up through the last bead you added.
For each stitch in this round, pick up one edge bead and one medallion bead. Stitch under the next thread bridge, then go up through the medallion bead. Adjust the edge bead so it sits centered above the two beads below it.
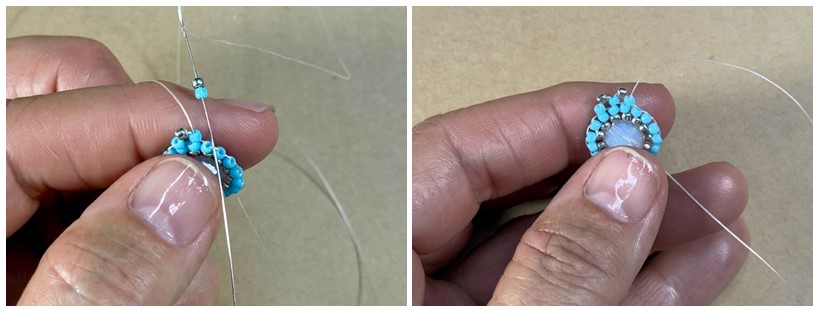
To keep your medallion flat and even, you’ll sometimes need to add two stitches under the same thread bridge. If your beadwork starts to curl, it might be due to tight thread tension or not adding enough extra beads. That said, a slight dome can look beautiful and flower-like—so if you like the look, go with it!
Complete the edge round of beads by adding one edge bead and passing down into the first bead of the row, under the thread bridge and then back up the bead.
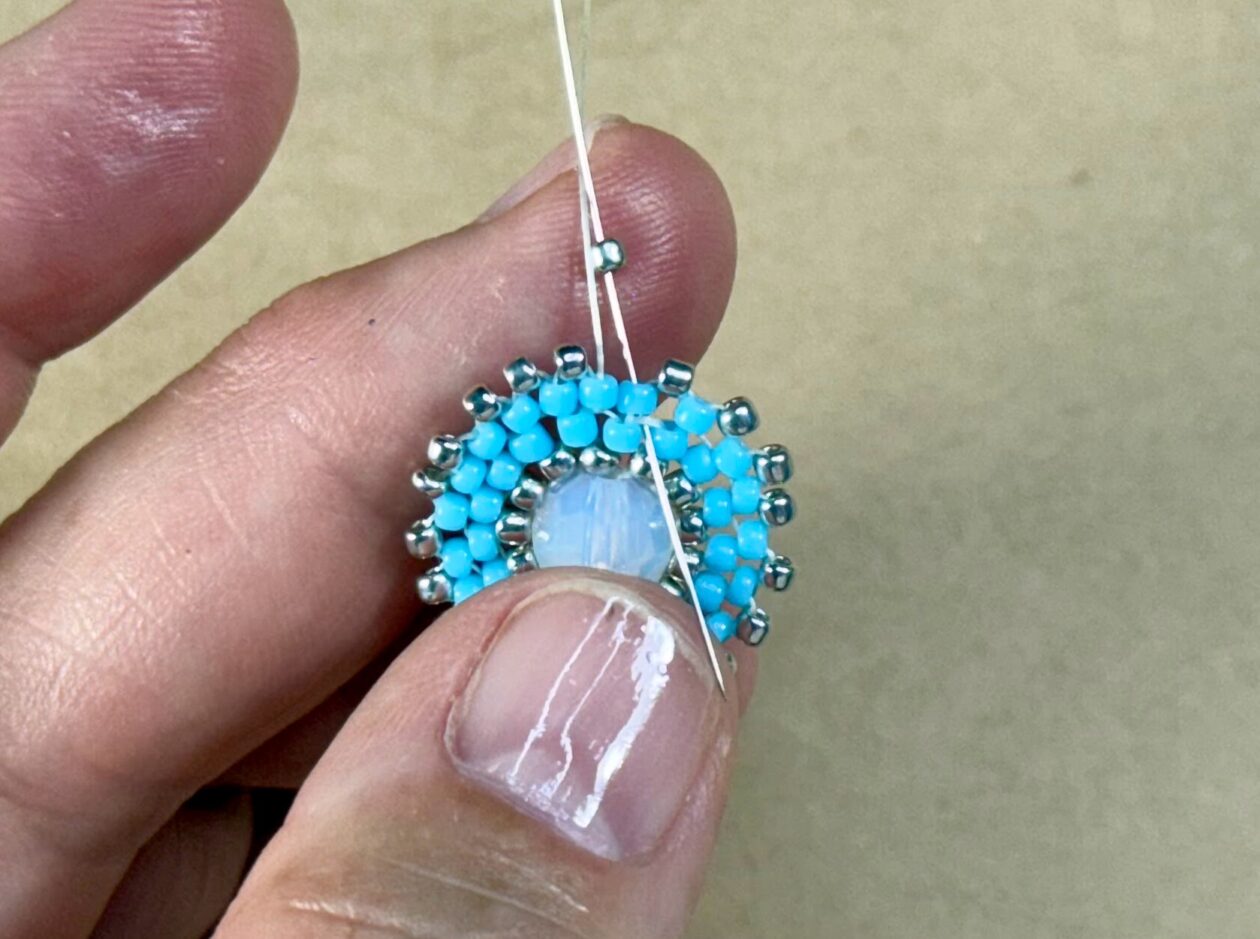
The medallion is complete. Next you will add a bead loop and secure and sew in the thread ends.
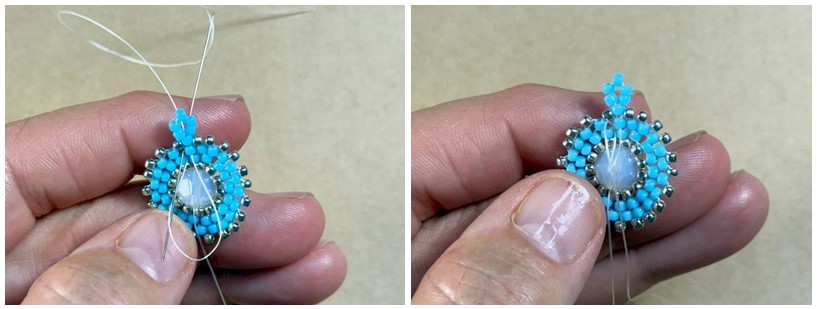
Beaded Hanging Loop
A bead loop is used to connect your medallion to purchased earring wires or to attach a pendant to a chain.
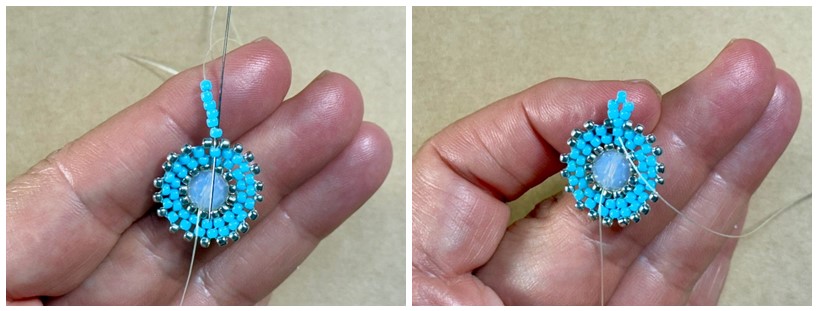
Pick up 6 beads, then pass your needle back through the first bead and the one your thread came out of. Pull the thread to form a loop.
If the loop looks uneven, use the tip of a pencil or similar tool to gently shape it. For a bigger loop, just add more beads—use an odd number so there’s always one bead in the center to protect the thread.
Finishing Thread Ends
To end your thread, make a small, hidden knot inside the beadwork.
Pass your needle under the thread between two beads and leave a small loop. Go through the loop and pull tight to make a knot.
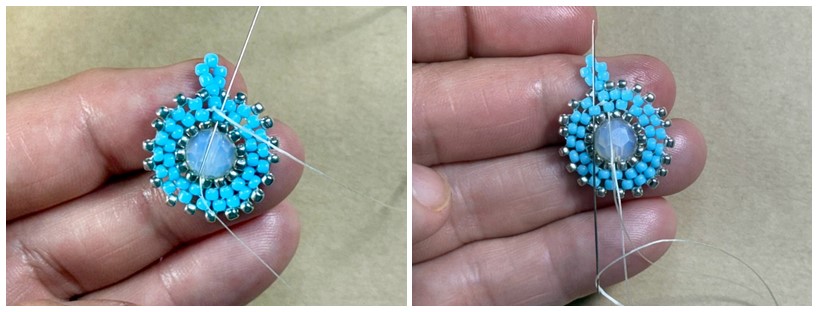
Then, weave the thread through a few nearby beads and trim it close. Repeat the same steps with the tail thread.
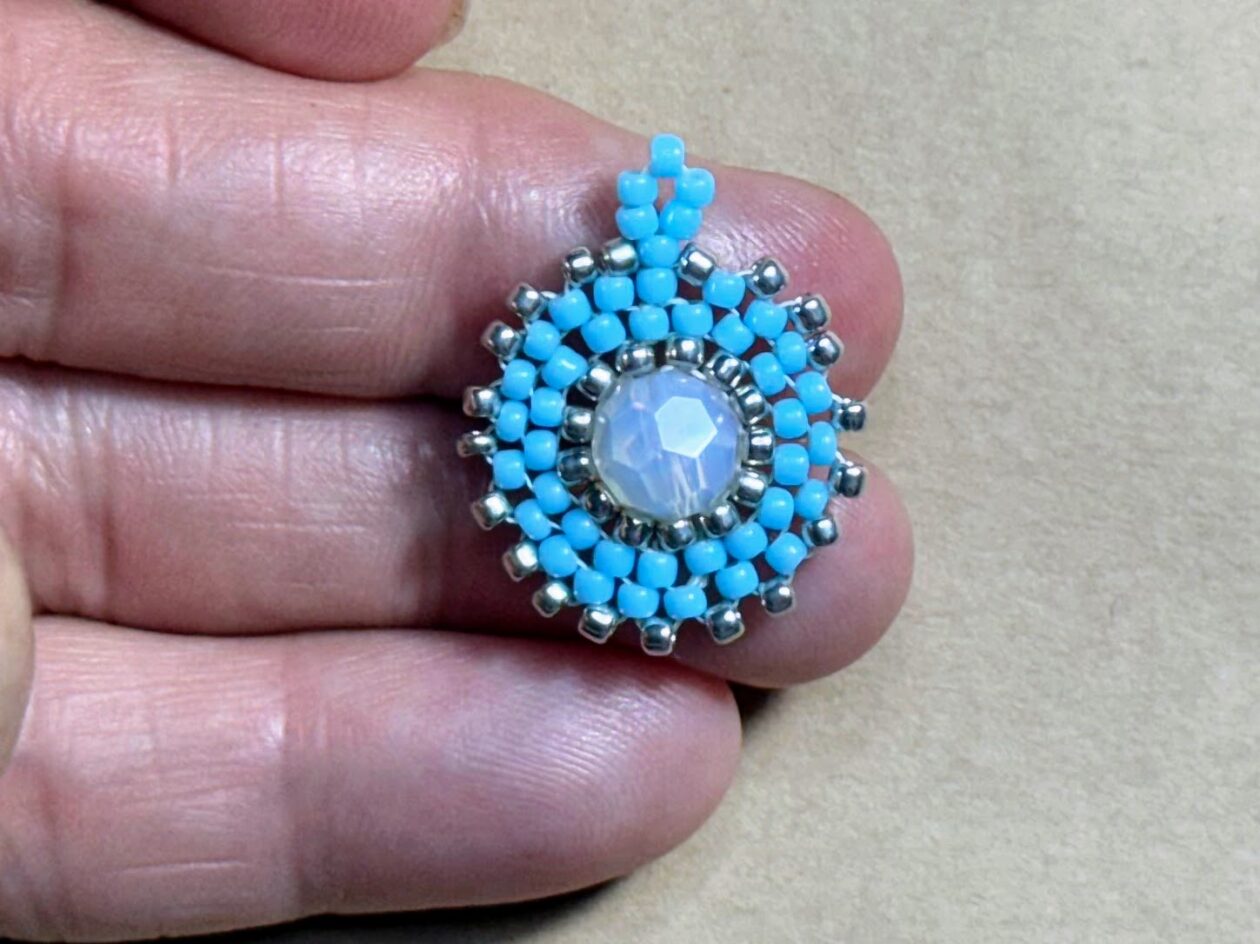
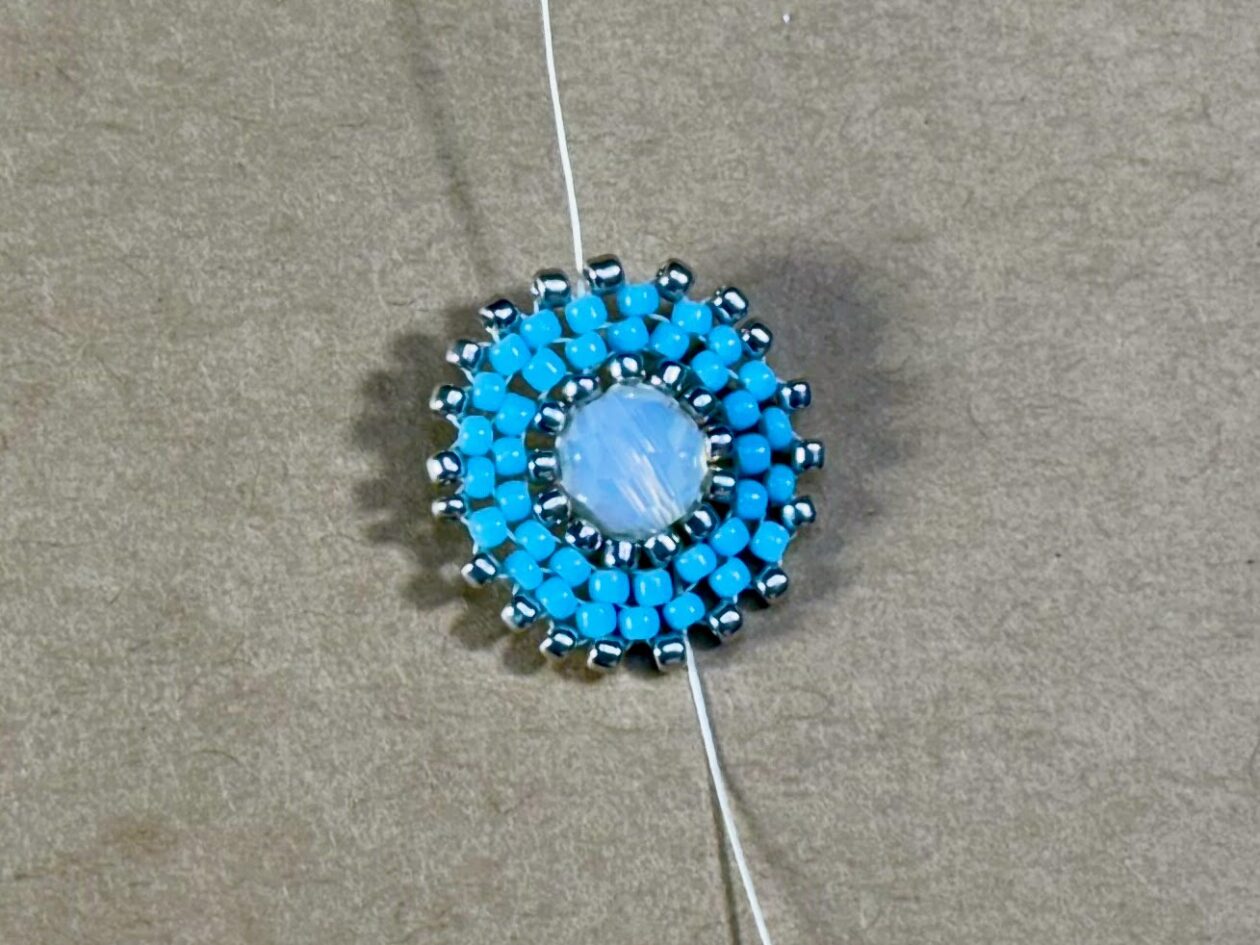
Your brick stitch medallion is complete! Whether it’s perfectly flat or has a bit of a dome, it’s one-of-a-kind and looks fantastic. Now that you’ve learned the basics, try mixing things up—use different colors, swap out the center bead, or experiment with various bead sizes and shapes. You can turn your medallion into all sorts of jewelry. Most importantly, enjoy what you’ve made and keep creating!