Learning a new needlework style like cross stitch can be a daunting task. There are so many techniques to master and supplies to gather, unknown stumbling blocks to navigate, and mistakes you don’t even know about until you make them. If you’re just starting out on your cross stitch journey, hooray for you! Cross stitch is how most crafters find their love of needlework—it’s an easy entry point because there’s only one stitch to learn (the eponymous X in cross stitch) and supplies are inexpensive and easy to find.
Cross stitch is easy to love, but there are certain areas where it can be frustrating. From tangled thread to knowing which fabric count you need to understanding how to start a pattern, EGA is here to show you 10 essential things everyone should know before starting cross stitch.
Pull Floss from Skeins at the Long Label End
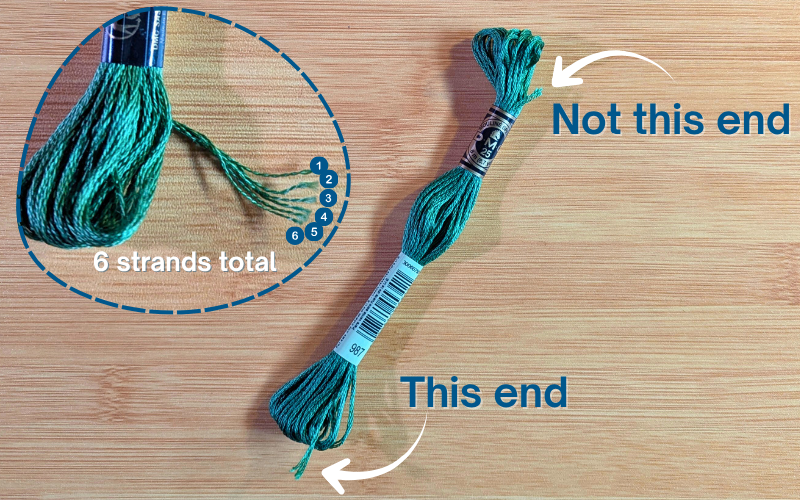
Many embroidery floss skeins come stranded. Perhaps the most recognizable brand, DMC embroidery floss, contains 6 individual strands of floss. A skein of DMC floss will have two loose ends—the beginning and end of the skein—that you can pull from to snip a length of floss and begin separating into individual strands.
To start cross stitching, you must separate the floss strands from the skein. It’s important to separate each floss strand even if you mean to hold them together, as it untwists the floss so you can stitch fuller, more even stitches.
It makes a big difference if you pull the wrong end of the DMC floss when it’s in the skein. Pulling the wrong end can cause the entire skein to bunch up, tangle, and knot together. To prevent this from happening, always find and pull the loose end found near the larger DMC label (as seen above). It will be much easier to find this loose end, and pulling it will not result in any tangles! Simply pull the length you need, cut it, and the rest of your embroidery floss skein will remain intact.
Read the Beginner’s Guide to Embroidery Floss to learn more about floss.
Start Low and Slow
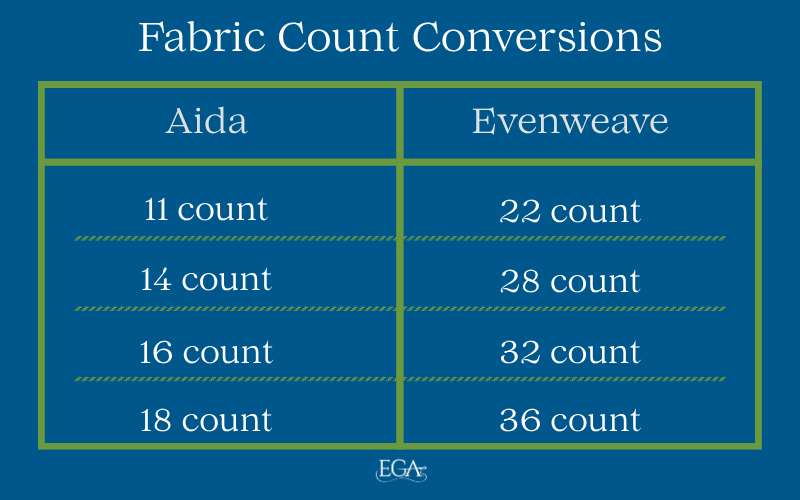
In general, many cross stitch patterns are designed with 14 count Aida in mind. The “count” refers to how many stitches fit within an inch of the fabric. So, 14 count Aida would have 14 stitches over 1 inch. The smaller the fabric count, the fewer stitches fit within the inch, the larger the grid of the fabric—and the easier each “square” is to see when you’re making stitches.
With Aida, you’re stitching over the single boxes within the fabric grid to make a single stitch, usually with two strands of floss at a minimum (sometimes referred to as “2 over 1,” or 2 strands over 1 square). With an evenweave or linen fabric, you may be stitching over 2 or more boxes within the fabric grid (sometimes referred to as “1 over 1” which is one strand over 1 square, or “2 over 2,” which is 2 strands over 2 squares).
The above image lists Aida fabric and evenweave equivalents. Notice that evenweave fabrics are double the count per inch of Aida fabrics. Evenweave fabrics show a tighter grid that is fairly hard to see, whereas Aida fabrics have a larger, more open grid, with more visible holes to stitch into. As a beginner, it’s best to start with 14-count Aida to familiarize yourself with the process.
Learn more about needlework fabrics in Fabric for Embroidery: The Beginner’s Guide.
Match Floss Strands to Fabric Count
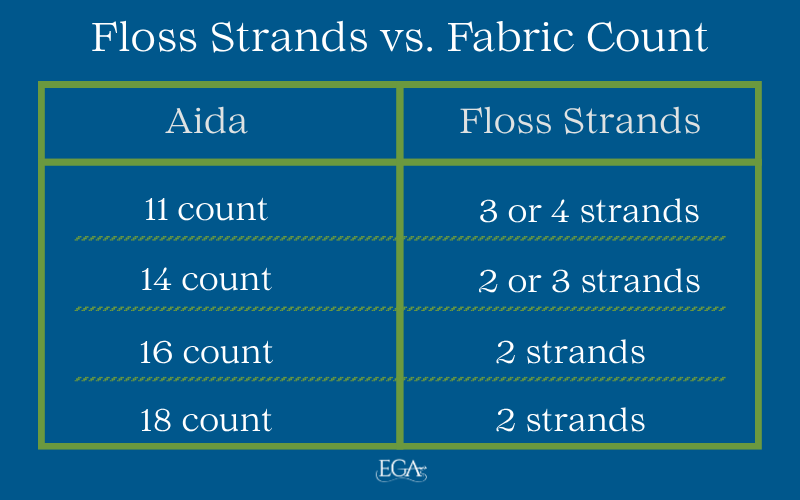
The number of strands you use for cross stitch is dependent on your fabric count and the coverage you would like to achieve. Some cross stitchers find certain colors to have thinner floss strands, and so opt to use additional strands to create better coverage on the fabric.
For instance, DMC 310 (black) is often used 3-stranded on 14-count Aida by cross stitchers who don’t want any of the white Aida fabric peeking through. However, most cross stitchers use 2 strands on 14-count Aida as a general rule, no matter the color. This comes down to personal preference, but in general, the count of your fabric will determine how many strands of floss to use. The smaller the fabric count, the more strands you will need. Refer to the above chart to determine the average number of floss strands needed for different Aida fabric counts. You can refer to the Fabric Count Conversions chart above to determine the same for evenweave fabric.
Don’t be afraid to experiment to see how many strands of floss works best for you!
Match Needle Size to Fabric Count

Cross stitch requires tapestry needles, and tapestry needles come in sizes 13 through 28. As with strands of floss, the size of your needle is determined by your fabric count. Generally, higher count fabrics correspond with larger needle sizes—but bear in mind that the larger the needle size, the smaller the needle.
This can be confusing to beginner cross stitchers—we encourage you to read EGA’s Guide to Embroidery Needles to learn more about types of needles and needle sizes.
Be Consistent With Stitch Direction
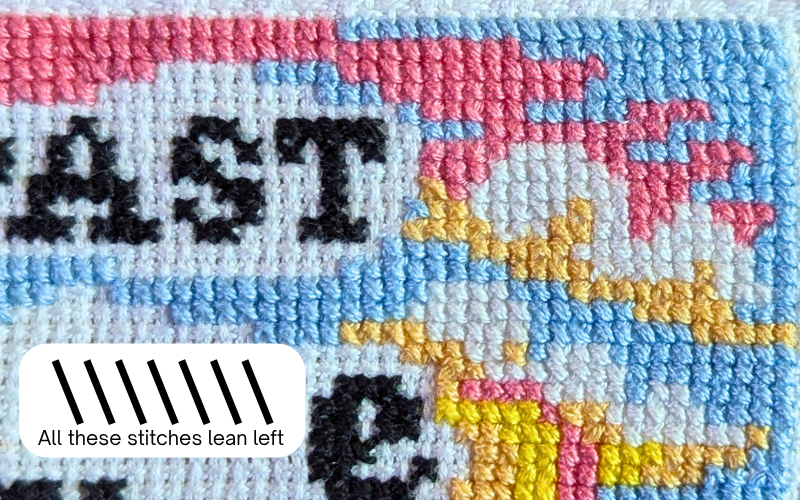
Take a look at the photo above. See how all of the top stitches lean to the left? Stitching all of your stitches in the same direction results in a much neater, uniform finish. It doesn’t matter how you start your stitches:
- up from bottom left, down through top right
- up from bottom right, down through top left
- up from top right, down through bottom left
- up from top left, down through bottom right
What matters is that you create your stitches the same way each time. So if you always use 1 or 3 as your first stitch, then use 2 or 4 to complete your cross stitch, you should always start with 1 or 3, and finish with 2 or 4. There is no noticeable visual difference between starting with 1 vs. 3, so if moving back and forth across a fabric means sometimes you need to start with 1 and sometimes you need to start with 3, you won’t see a difference. However, you will see the difference if you cross some stitches so they lean left and others so they lean right. Consistency is key!
Up Through a Clean Hole, Down Into a Stitch
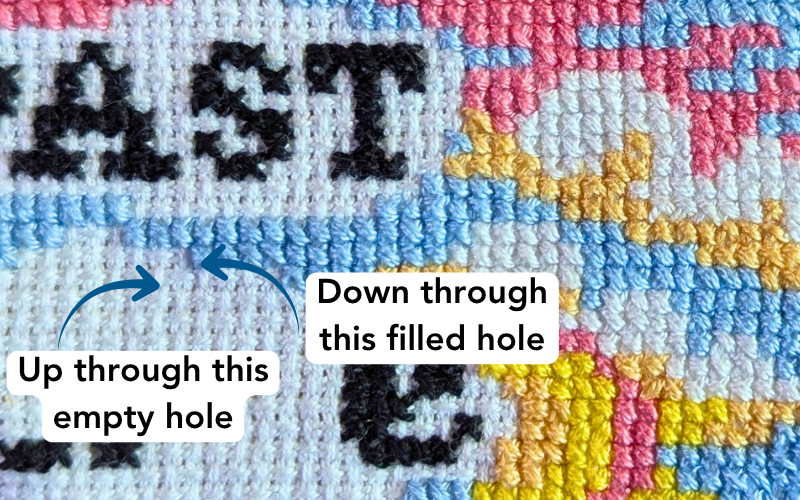
It won’t always be possible with all cross stitch designs, especially as you begin working on more dense designs, but a general rule of thumb is that it is easier to draw your needle up through a clean hole and bring it down into a previously stitched hole. This will help you avoid snagging floss in the back and accidentally pulling it through to the front. When possible, start a stitch with a clean hole!
Mind Your Back
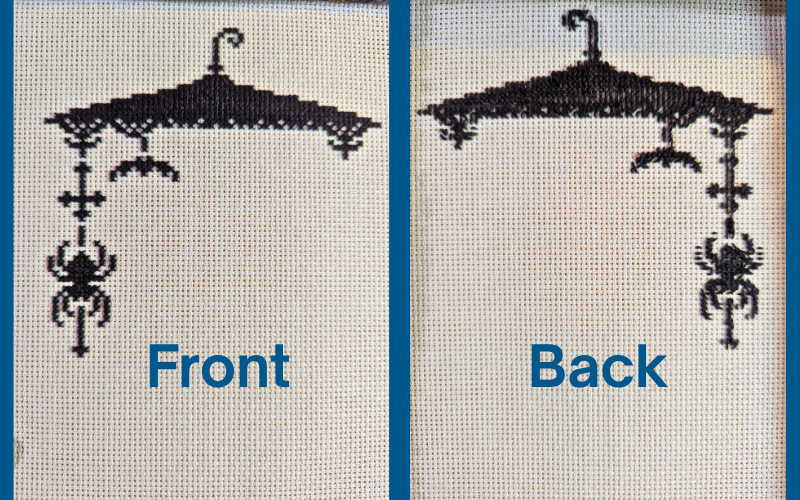
Take breaks to check your back periodically. Embroidery floss has a tendency to twist and tangle as you work with it (see below for more on that), so it’s a good idea to stop every now and again to see how the back of your work looks. You may find areas where the floss has bunched in on itself, shortening your length of floss and creating a mess on the back—and now you have to unpick stitches to loosen that area and straighten it out. The more you look at the back, the happier you’ll be in the long run!
Let Your Needle Hang
As mentioned above, floss has a tendency to twist on itself as you’re stitching. This forces your floss into a tightly twisted state, resulting in less full stitches and more opportunities for tangles. Every so often, pick up your work and let your needle hang. Gravity will force your needle to spin in the opposite direction in which it is twisted.
Trap Loose Ends and Long Floats Often
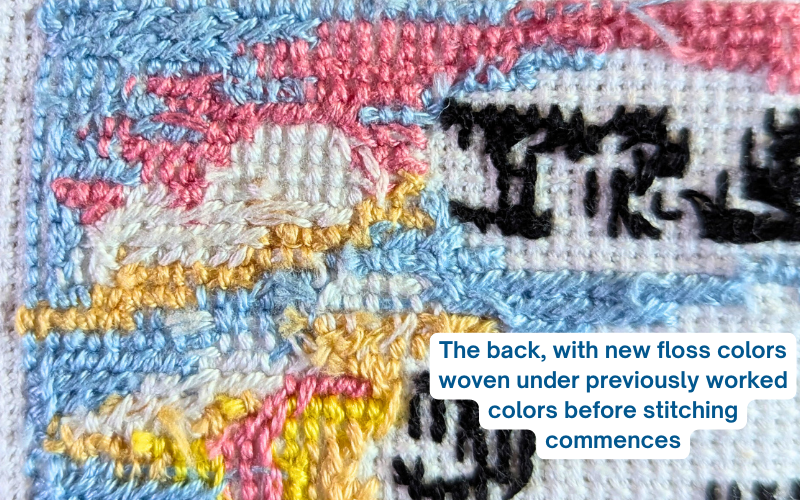
Speaking of tangled thread, don’t neglect to start and end your embroidery floss by securing it under a line of stitches. Also, if you’re bringing your floss from one area of the fabric to 5 or more stitches away, weave your needle through stitches on the back to tack the floss in place. It’s very easy to get tangled in loose bits of floss at the back of your work and wind up pulling them to the front of your work.
Aim To Start in The Middle of Your Design
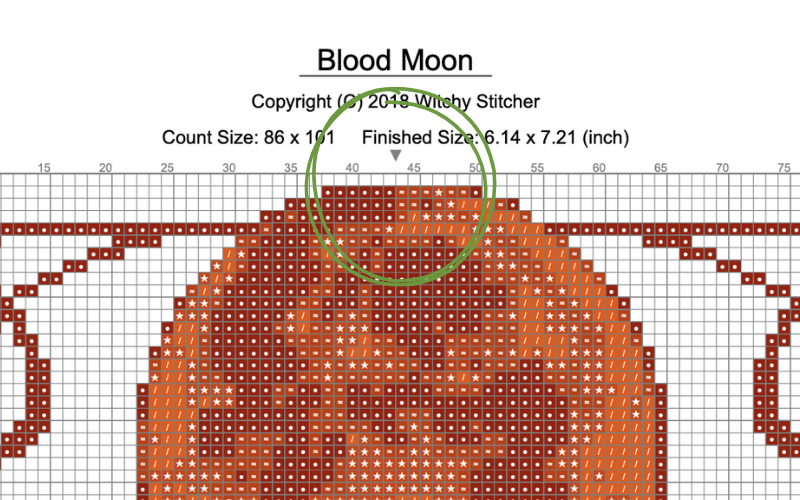
Most cross stitch designers will indicate the middle of the design to give stitchers an easy place to start. It’s easier to start with the middle of the design because then you don’t have to measure the fabric to determine where to start stitching. See the circled arrow above for reference. Good cross stitch designers will include an arrow at the top and bottom middle, as well as the left and right middle.
To determine the middle of your fabric, simply fold it widthwise and then lengthwise. Then, look at your pattern and trace an arrow from the top or bottom and either side, following their paths until they intersect in the middle. You can begin your work with this stitch, aligning it with the point in your fabric where your folds intersect.
Railroad Stitches for Fuller, More Even Coverage
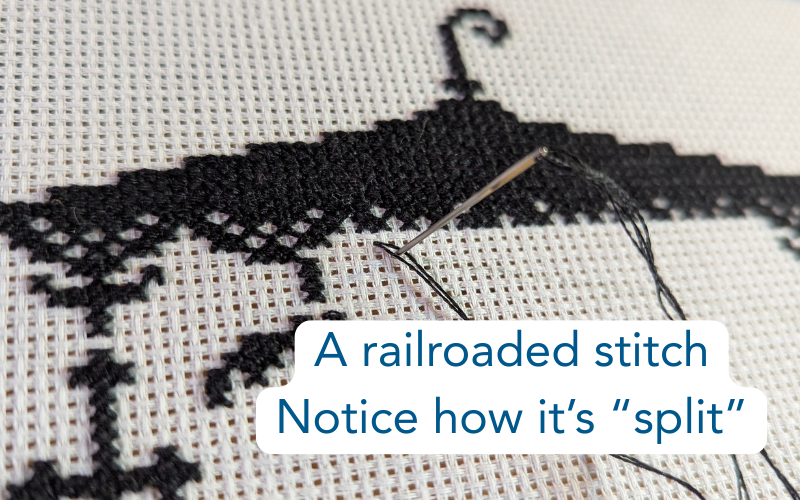
A lot of cross stitchers grow frustrated with uneven Xs or uneven coverage. This is usually the result of the floss twisting on itself, and sometimes, even allowing the floss to untwist doesn’t help. This is where railroading your stitches can work wonders.
To railroad your stitches, simply split the two (or more) strands of floss when you bring your needle back down into the fabric. Railroading separates the floss strands, allowing for more even coverage. It’s an extra step that may slow down your stitching, but it results in much fuller stitches. And, with practice, you may find it doesn’t take much longer to do.
We hope these tips help you enjoy learning more about cross stitch! EGA has a library of Free Projects for new stitchers to explore and enjoy, and offers even more patterns to EGA members in our Petite Projects library. Join us to learn more!